
Client User Guide
Your guide to completing security assessments and understanding your cyber risk score
Access Your Dashboard
Use the credentials from your broker's invitation email to log in
Start Security Assessment
Click 'Start Security Assessment' and follow the step-by-step instructions
Complete Questionnaire
After scan completes, fill out organizational questionnaire for complete HDI score
Security Assessments
- • Scan AWS, Azure, GCP, and Microsoft 365 environments
- • Automated security checks powered by Prowler
- • View detailed compliance and security findings
- • Track scan history and progress
- • Review recommendations to fix each finding
Organizational Questionnaire
- • Answer security policy and practice questions
- • Contributes 30% to your final HDI score
- • Auto-saves progress as you complete
HDI Cyber Risk Score
- • Comprehensive cyber security rating (0-100)
- • Combines technical scans with organizational maturity
- • Track improvements over time
- • Both complete questionnaire answered and scans are needed to calculate it
Running Your First Security Scan
- 1.Click 'Start Security Assessment' from dashboard
- 2.Choose cloud provider (AWS, Azure, GCP, or M365)
- 3.Follow provider-specific setup instructions
- 4.Enter required credentials or access keys
- 5.Start scan and wait for completion (typically 5-15 minutes)
Completing the Questionnaire
- 1.Answer questions about security policies and practices
- 2.Progress saves automatically as you go
- 3.Submit when complete to calculate final HDI score
Viewing Your Results
- 1.Navigate to 'Previous Assessments' section
- 2.Click 'View Results' on completed scan
- 3.Review HDI score, compliance findings, and recommendations

Amazon Web Services (AWS)
Comprehensive security assessment for AWS infrastructure

Microsoft Azure
Azure cloud security scanning and compliance checks

Google Cloud Platform (GCP)
Google Cloud Platform security analysis

Microsoft 365
Microsoft 365 security configuration review
This guide covers setting up authentication for AWS security scanning using IAM roles or access credentials.
This method grants permanent access and is the recommended setup for production environments.
CloudFormation Setup Steps:
Alternative: Use the CloudFormation Quick Create link from the scan setup page
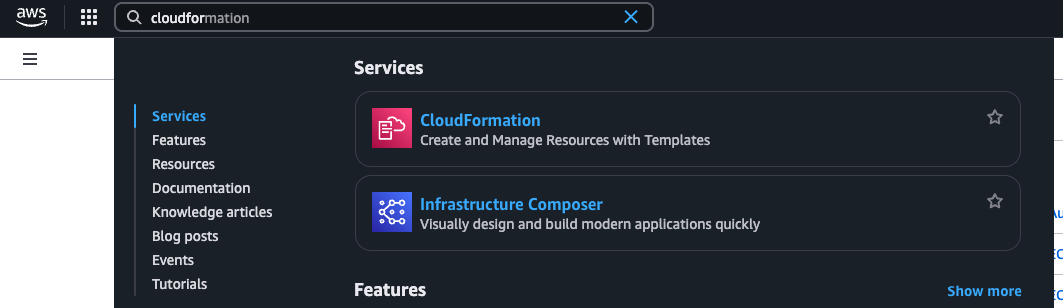
- Open the AWS Console and search for CloudFormation(AWS CloudFormation)
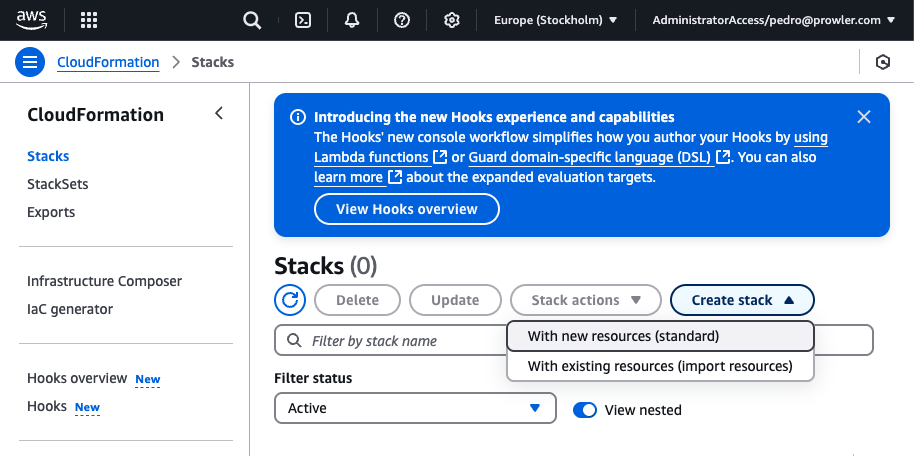
- Go to Stacks and click "Create stack" > "With new resources (standard)"
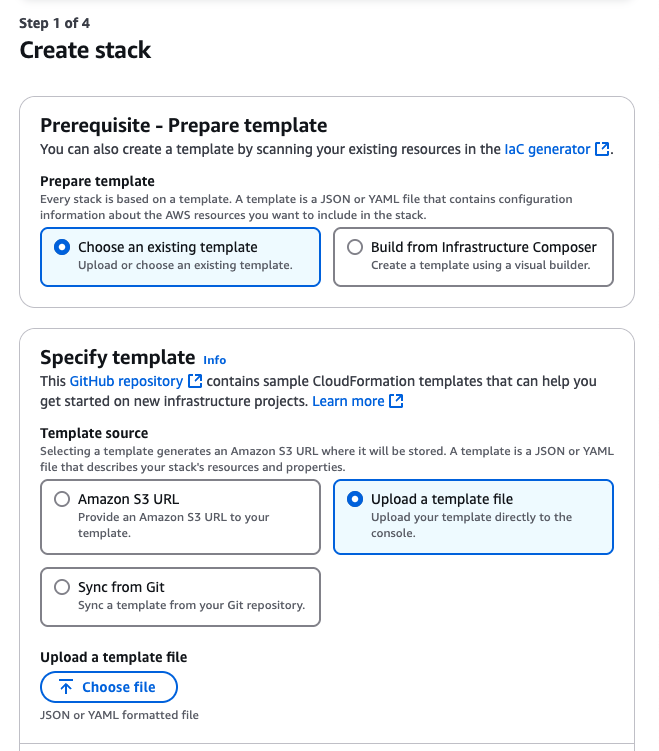
- In Specify Template, choose "Upload a template file" and select the downloaded file

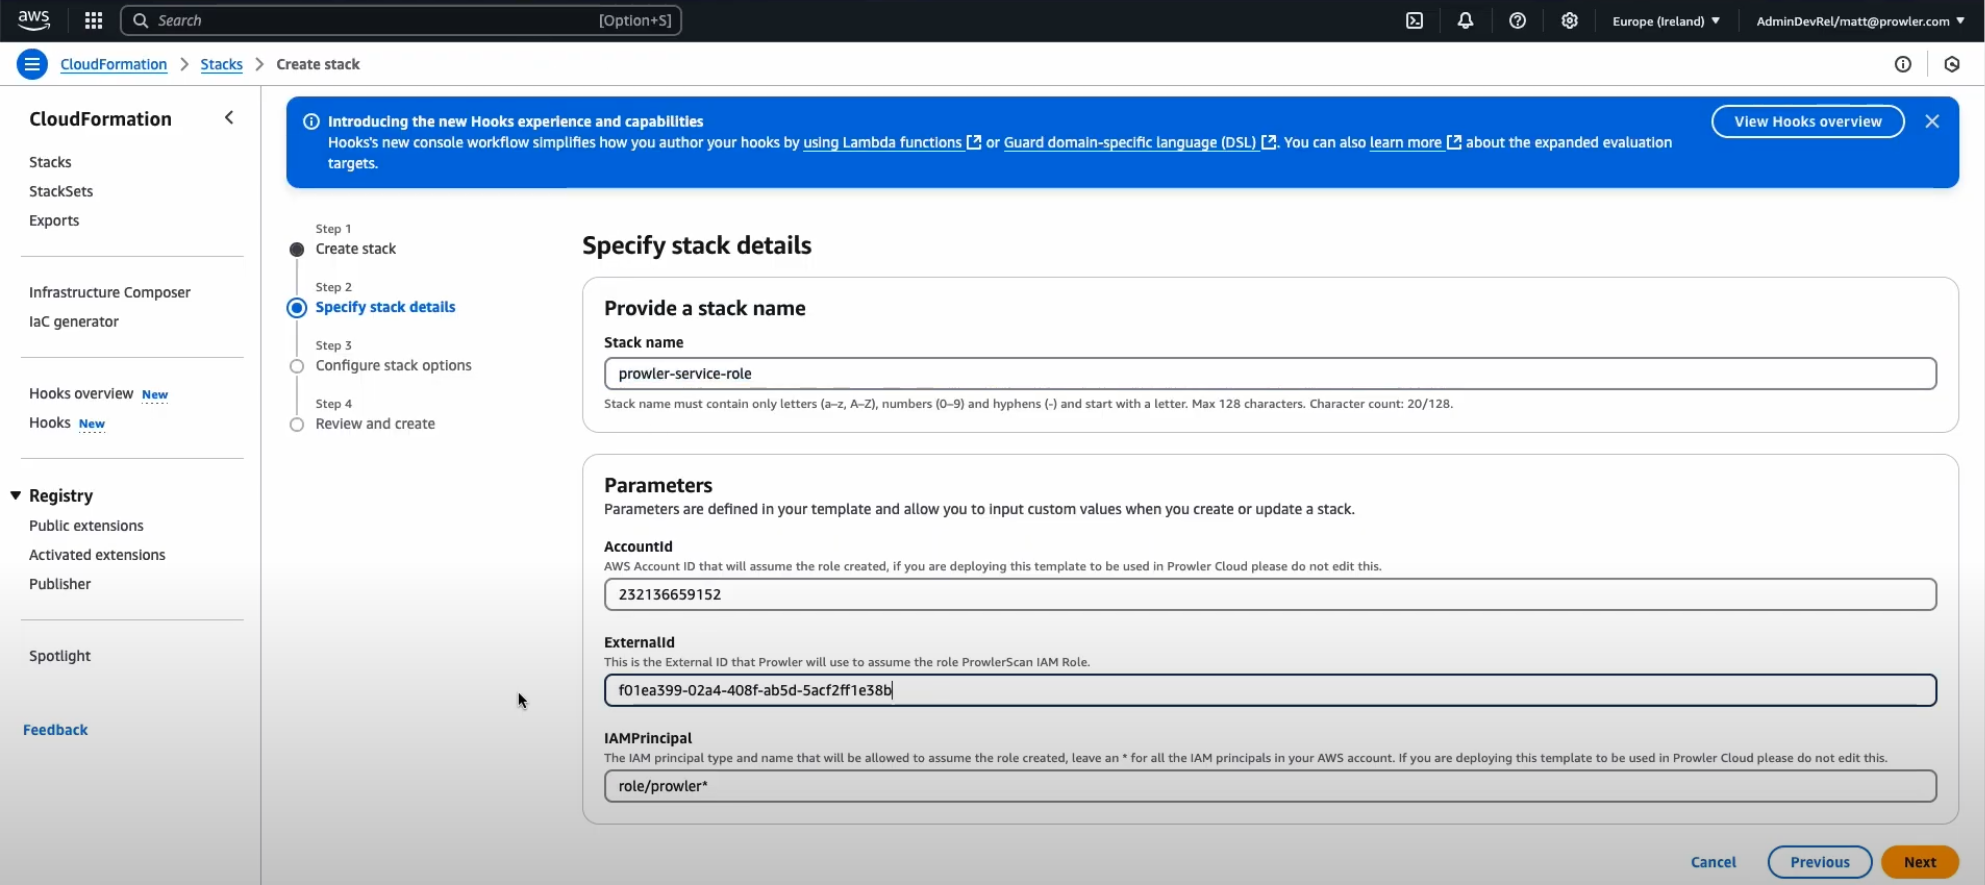
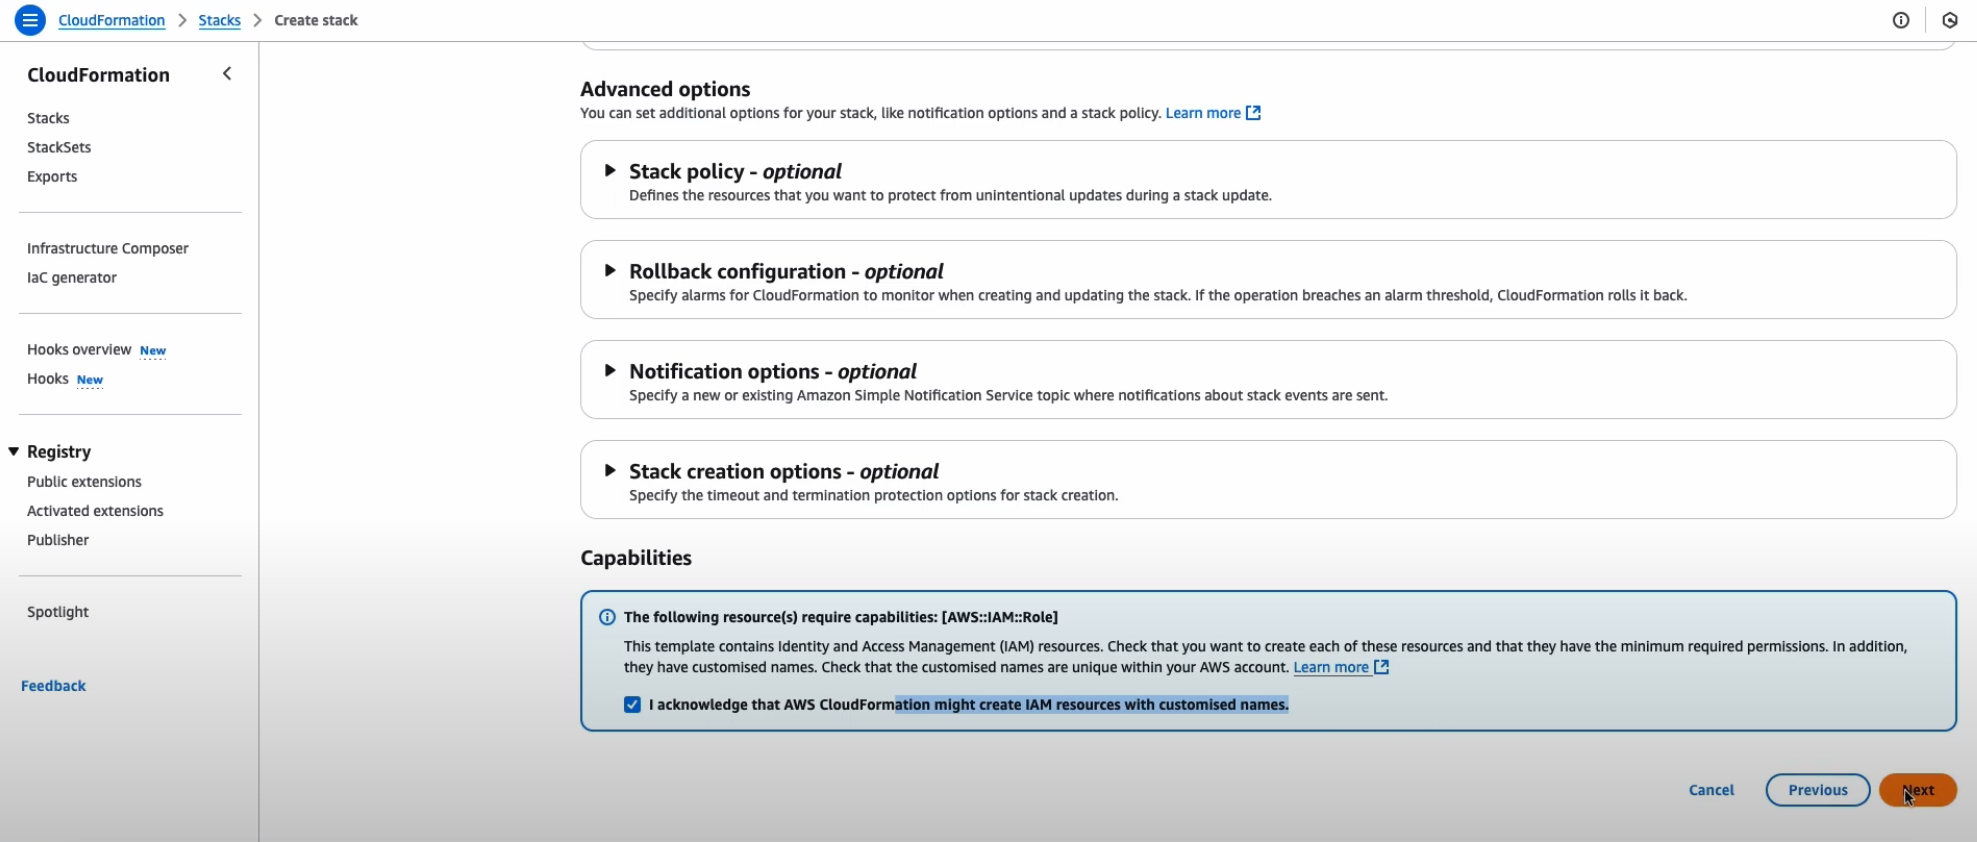
- Click "Next", provide a stack name and the External ID
- Acknowledge the IAM resource creation warning and proceed
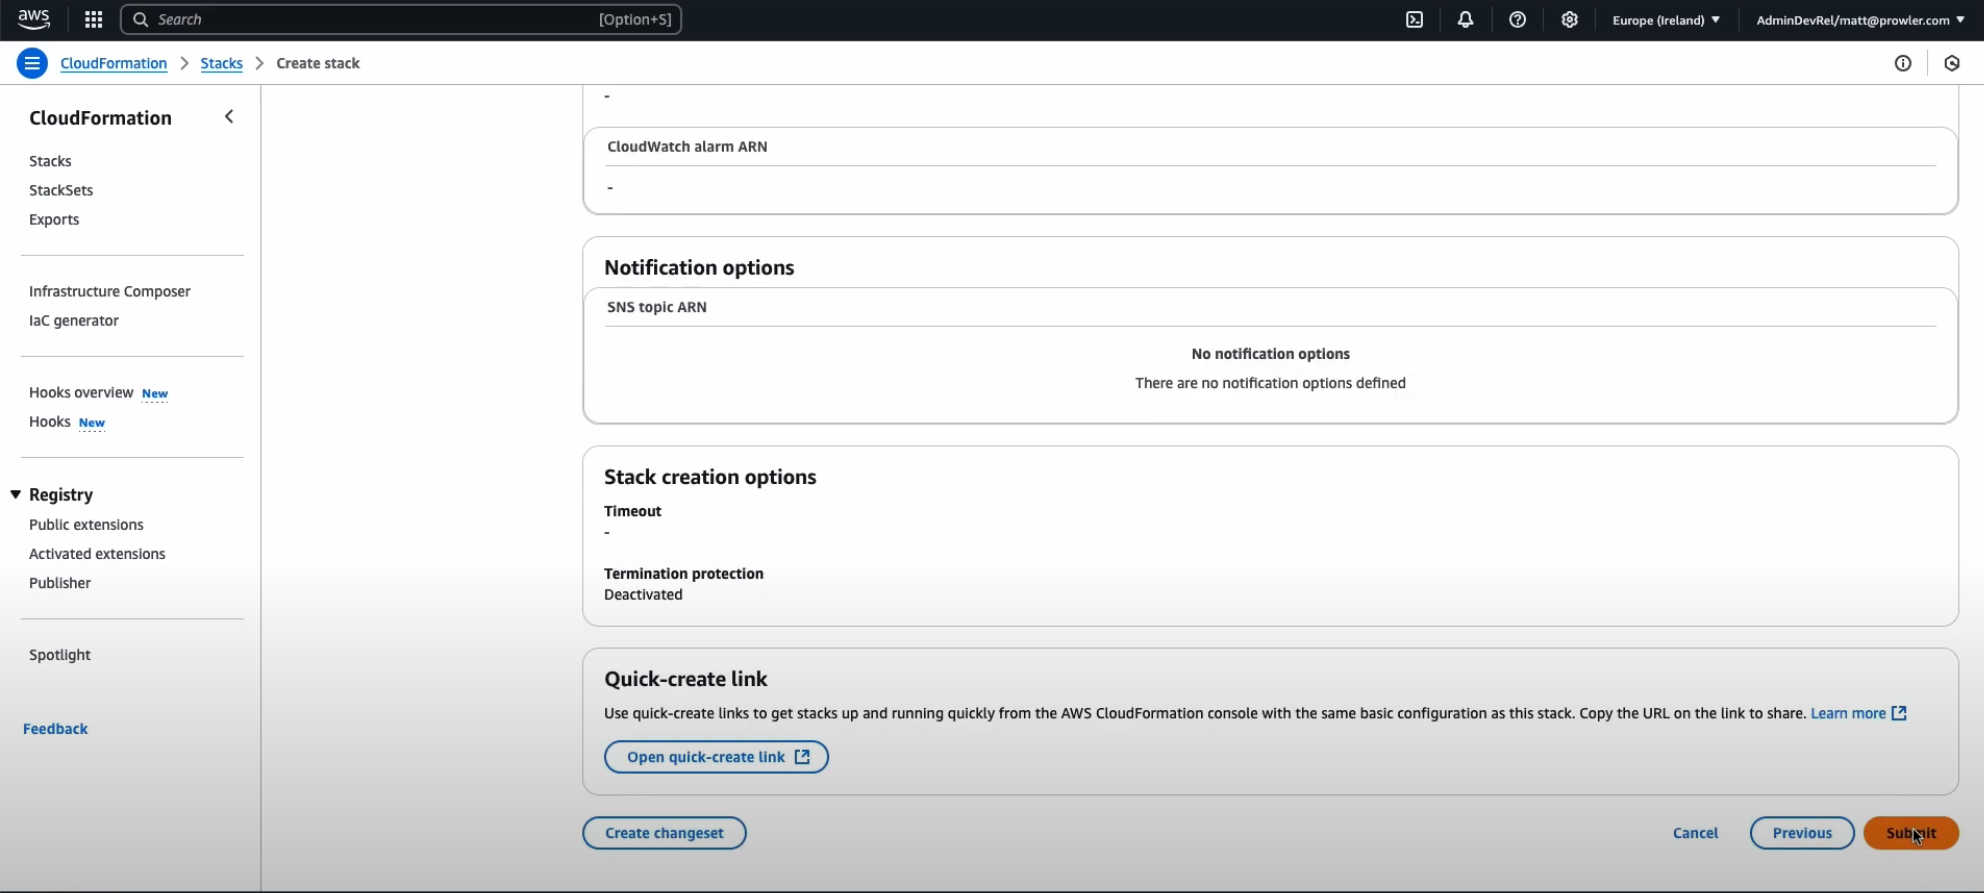
- Click "Submit" to deploy the stack
Use AWS access keys for authentication. Prefer short-term credentials over long-term keys.
Short-term credentials (Recommended):
Temporary credentials automatically expire, providing enhanced security for one-time scans.
How to get temporary credentials:
- Go to the AWS Console and open CloudShell (AWS CloudShell)

- Run the following command to get temporary session credentials:# Get session token (valid for 1 hour)aws sts get-session-token --duration-seconds 3600
This generates temporary credentials that expire after 1 hour (3600 seconds). You can adjust the duration up to 36 hours.
- The command returns three values you'll need:AccessKeyId: AKIAIOSFODNN7EXAMPLESecretAccessKey: wJalrXUtnFEMI/K7MDENG/bPxRfiCYEXAMPLEKEYSessionToken: FwoGZXIvYXdzEBYaD...
- Copy all three values (AccessKeyId, SecretAccessKey, SessionToken) and paste them when scanning
Alternative:
If you're already in AWS CloudShell, you can use the existing session credentials:
Copy the AWS_ACCESS_KEY_ID, AWS_SECRET_ACCESS_KEY, and AWS_SESSION_TOKEN values from the output.
Long-term/Static Credentials (Not Recommended)
Static credentials do not expire and pose a higher security risk. Use temporary credentials or IAM roles instead whenever possible.
If you must use static credentials:
- Sign in to the AWS Management Console
- Navigate to IAM > Users (IAM Users)
- Select your user or create a new IAM user with SecurityAudit and ViewOnlyAccess policies
- Go to Security credentials tab
- Click "Create access key" and select "Third-party service" or "Other" as the use case
- Copy the Access Key ID and Secret Access Key (Session Token is not provided for static credentials)
Security Warning: Remember to delete these static credentials within 7 days after your scan is complete. Go to IAM > Users > Security credentials and delete the access key.
Deploy Prowler scanning role across all accounts in your AWS Organization using CloudFormation StackSets.
Step 1: Account Discovery Phase
Before scanning, you need to discover all accounts in your AWS Organization. This is a temporary step that requires management account credentials.
Required Permissions for Discovery
The user or role used for discovery must have these AWS Organizations permissions:
How to set up a discovery role in your management account:
- Sign in to your AWS management account
- Go to IAM > Roles and click "Create role"
- Select "AWS account" as trusted entity type, and choose "Another AWS account"
- Enter your management account ID (to allow assuming from the same account)
- Attach a policy with organizations:ListAccounts and organizations:DescribeOrganization permissions
- Name the role (e.g., "ProwlerDiscoveryRole") and copy the role ARN to use for discovery
Using the discovery role:
- Create temporary credentials that can assume the discovery role (use aws sts assume-role or CloudShell)
- Toggle "Scan Entire Organization" and provide the temporary access keys
- Click "Discover Accounts" to fetch all accounts from AWS Organizations API
- Review discovered accounts and uncheck any you want to exclude from scanning
- Switch to IAM Role authentication for secure scanning across all selected accounts
Important: The access keys provided must have permission to assume the discovery role with Organizations permissions. These credentials are only used temporarily for discovery and are NOT stored. After discovery, you must use IAM Role for secure organization-wide scanning.
CloudFormation StackSets Deployment Steps:
- Log in to your AWS management account
- Navigate to CloudFormation > StackSets (CloudFormation StackSets)
- Click "Create StackSet" and choose "Service-managed permissions"
- For template source, choose "Amazon S3 URL" and paste the template URL
- Provide the External ID parameter (shown in the scan setup page)
- Deploy to your entire organization or specific OUs, then wait for completion across all accounts
StackSet Template S3 URL:
Important: The External ID must match the one shown in your scan setup page. Use the same External ID for all accounts in the organization.
GCP supports two authentication methods. Choose the one that best fits your needs.
This method uses a service account with a downloaded JSON key file for authentication.
Steps to create a Service Account:
- Go to the Service Accounts page in the GCP Console
- Click "Create Service Account"
- Fill in the service account details and click "Create and Continue"
- Grant the service account the "Reader" role
- Click "Done"
- Find your service account in the list and click on it
- Go to the "Keys" tab
- Click "Add Key" → "Create new key"
- Select "JSON" and click "Create"
- Save the downloaded key file securely and paste its contents when scanning
This method uses the Google Cloud CLI to authenticate and is suitable for development and testing environments.
Steps to obtain OAuth2 credentials:
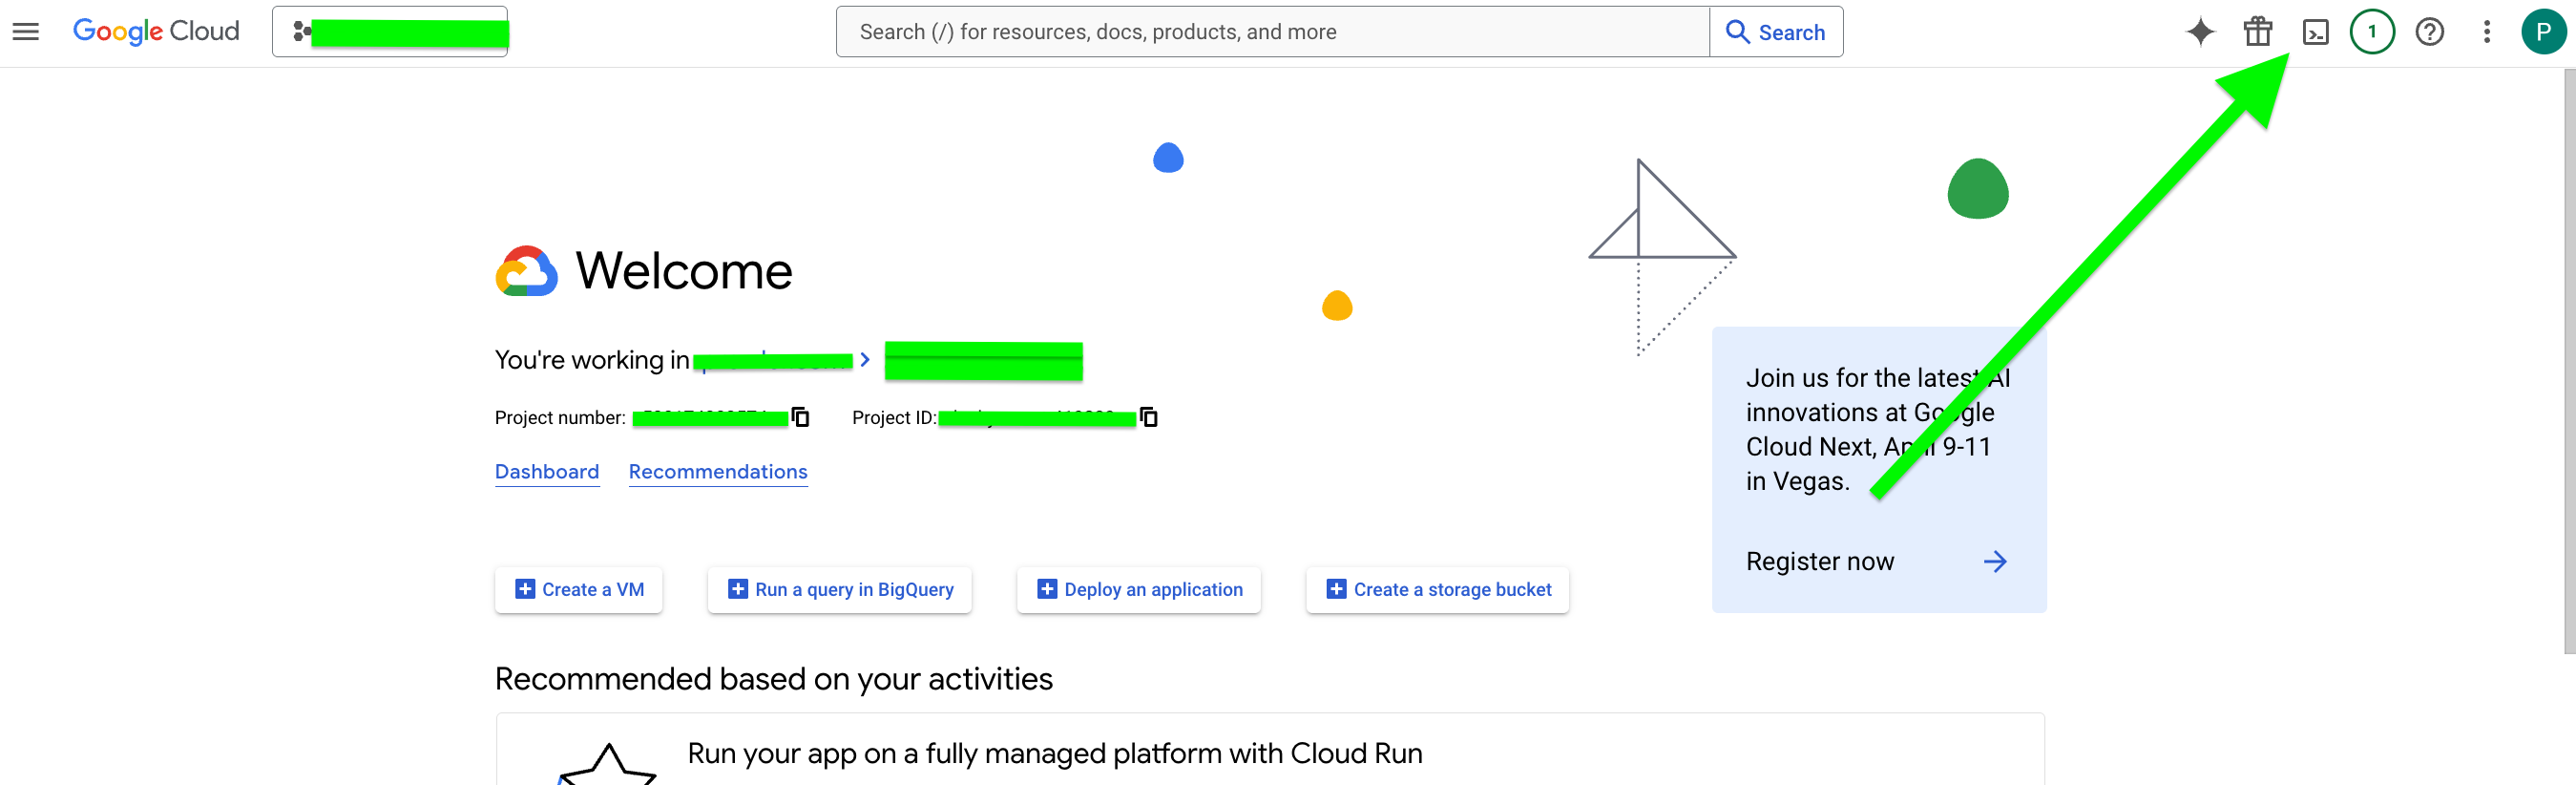
- In the GCP Console, click on "Activate Cloud Shell"
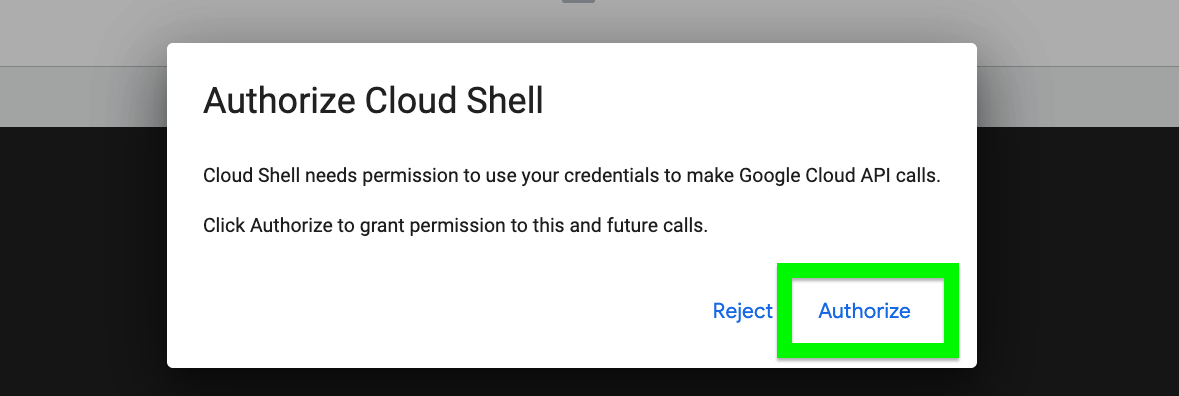
- Click "Authorize Cloud Shell" when prompted
- Run the following command:
gcloud auth application-default login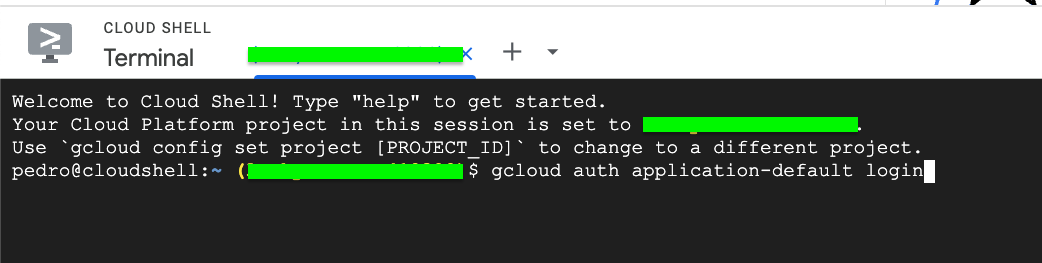
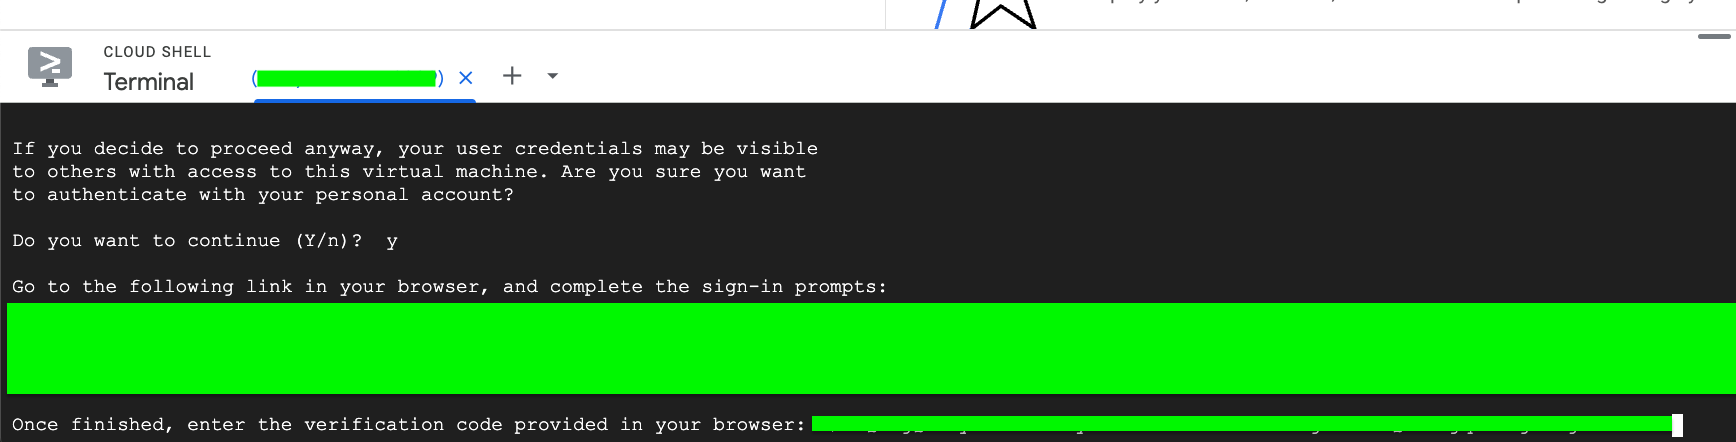
- Type Y when prompted
- Open the authentication URL provided in a browser and select your Google account
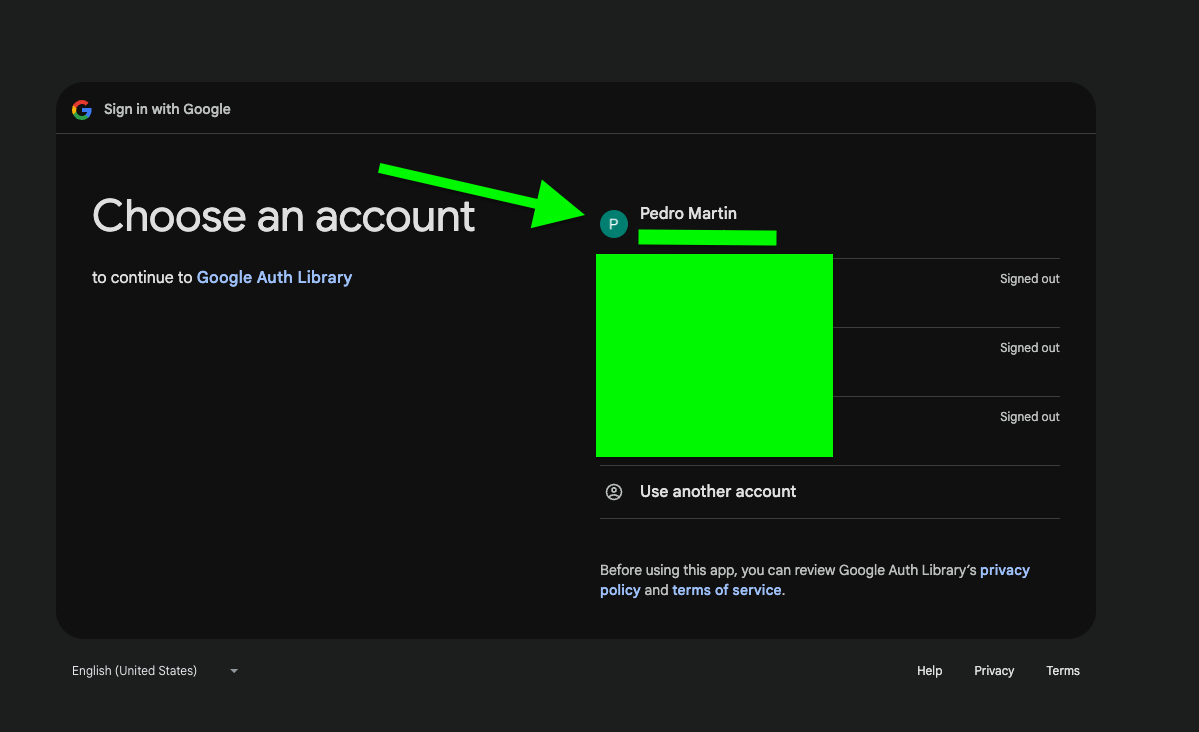
- Follow the steps to obtain the authentication code
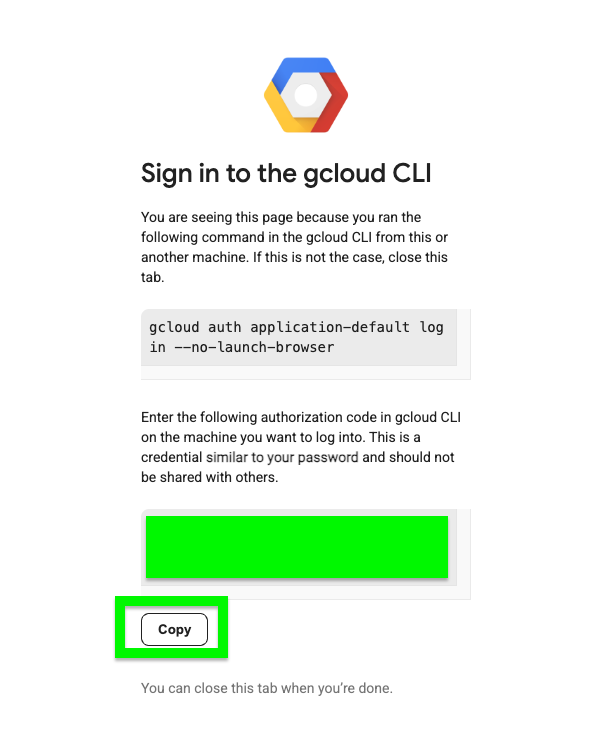
- Paste the authentication code back in Cloud Shell
- Use cat ~/.config/gcloud/application_default_credentials.json to view the temporary credentials file
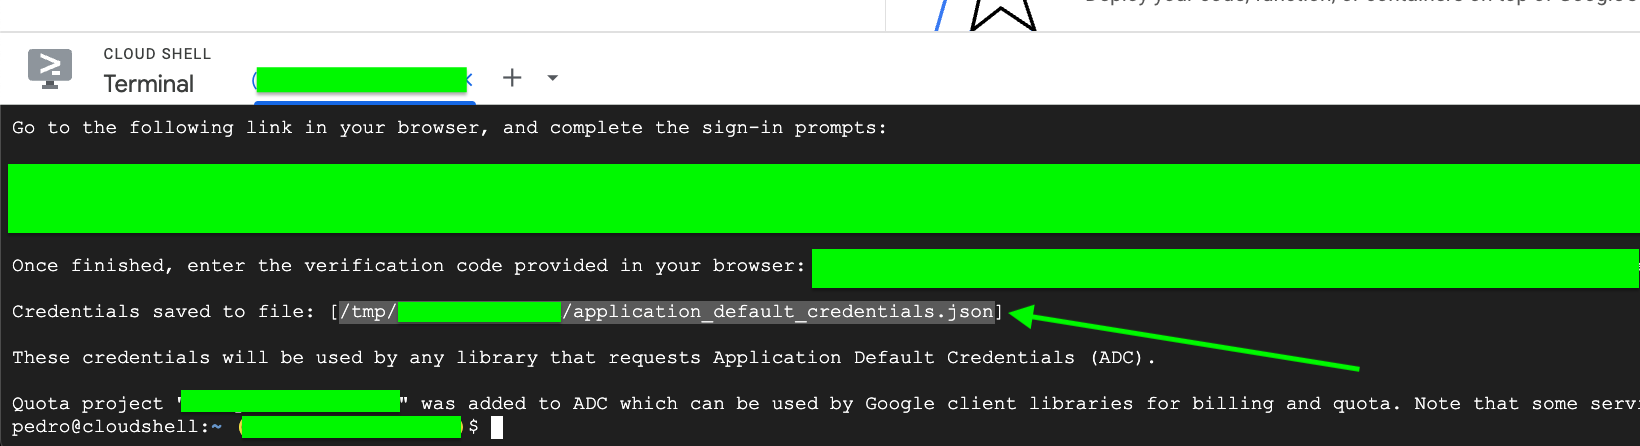
Extract these values for scanning:
client_idclient_secretrefresh_token

Required Permissions
- Reader role must be granted at the project, folder, or organization level
- IAM API must be enabled in at least one project
- Service Usage Consumer role is required for resource scanning
- A quota project must be configured
This guide covers Service Principal authentication, the recommended method for secure access to your Azure subscriptions.
Required Permissions
Microsoft Entra ID Permissions
These permissions allow Prowler to retrieve metadata and perform Entra checks. While not mandatory, they enhance functionality.
Steps to assign required API permissions:
- Go to your App Registration > "API permissions"
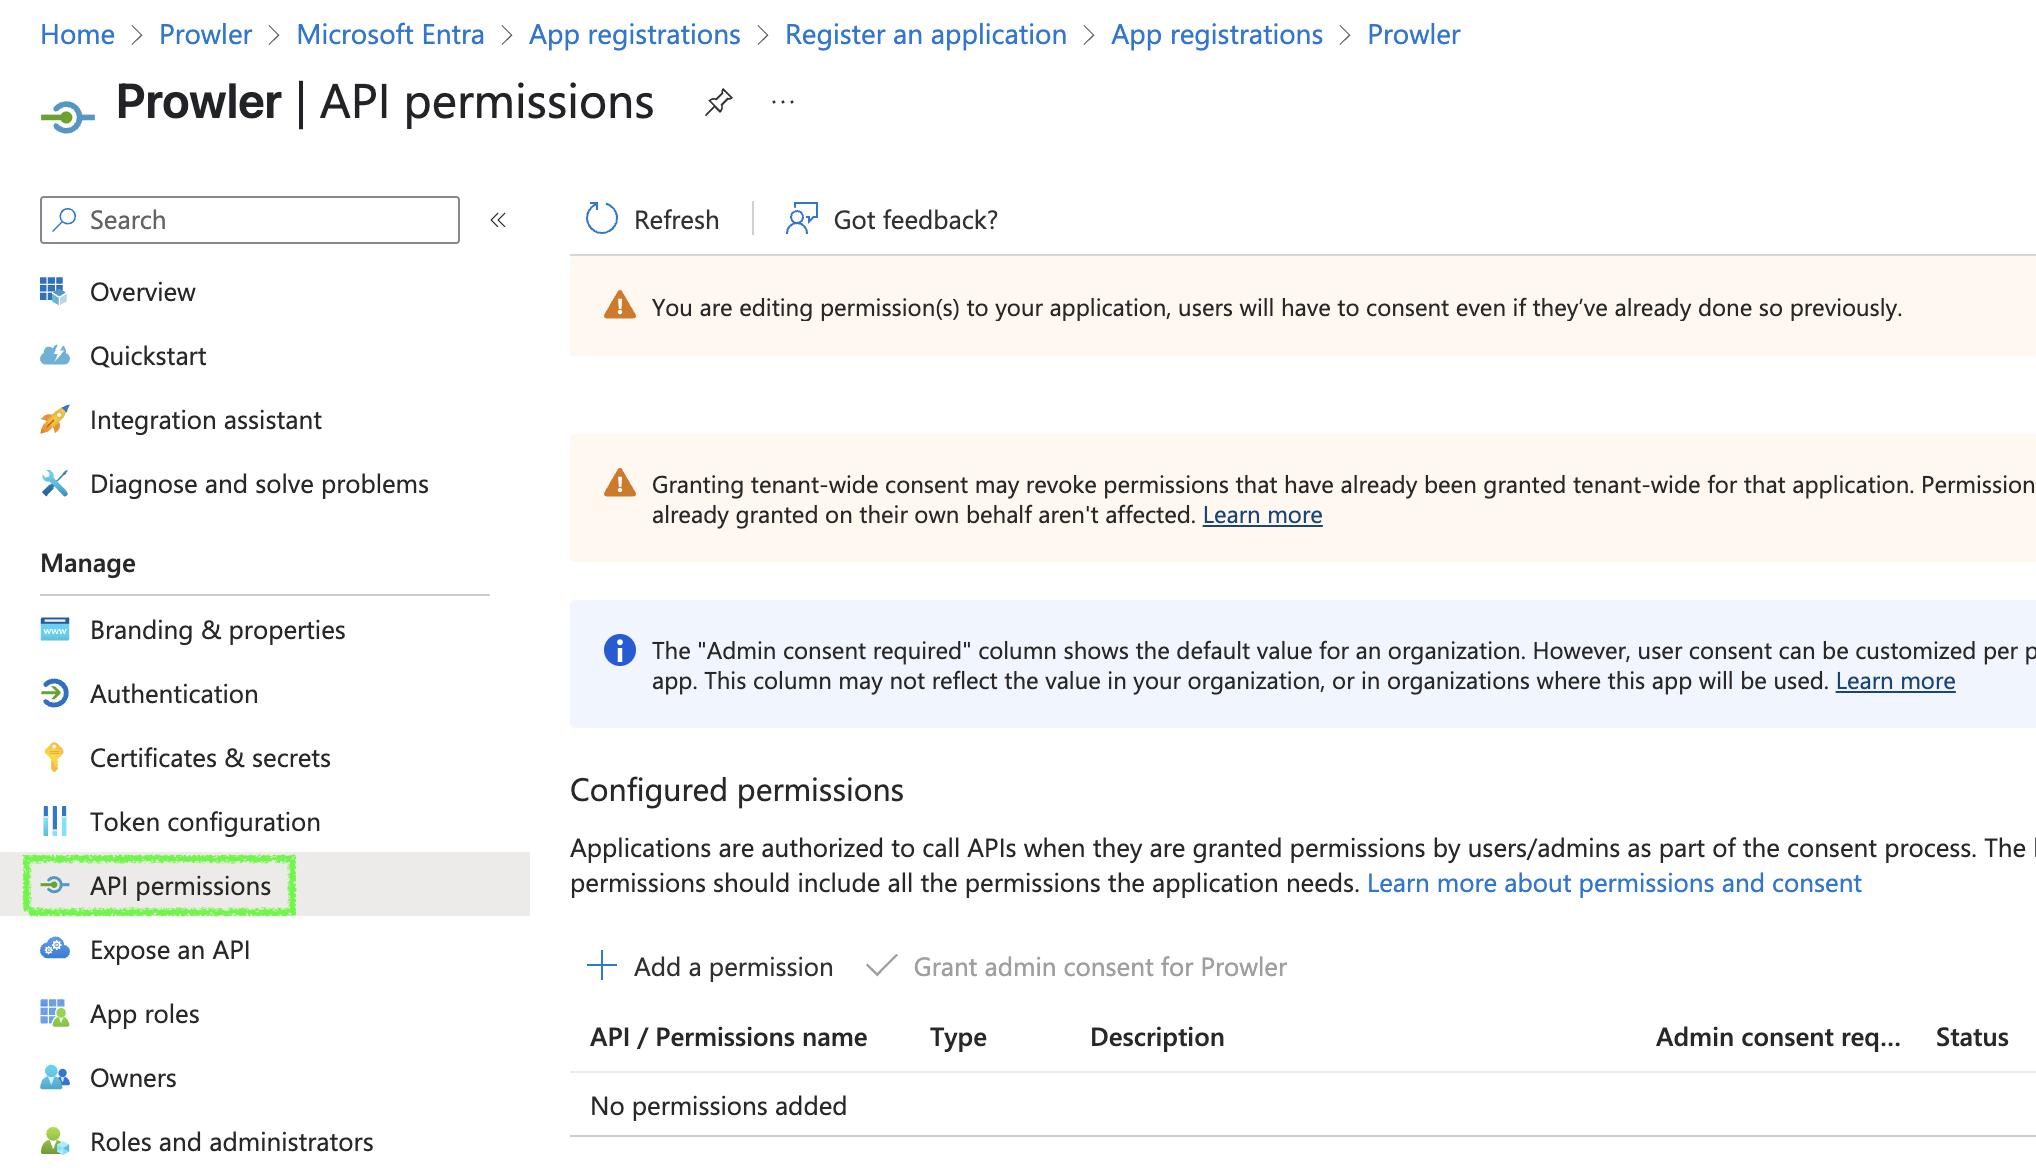
- Click "+ Add a permission" > "Microsoft Graph" > "Application permissions"
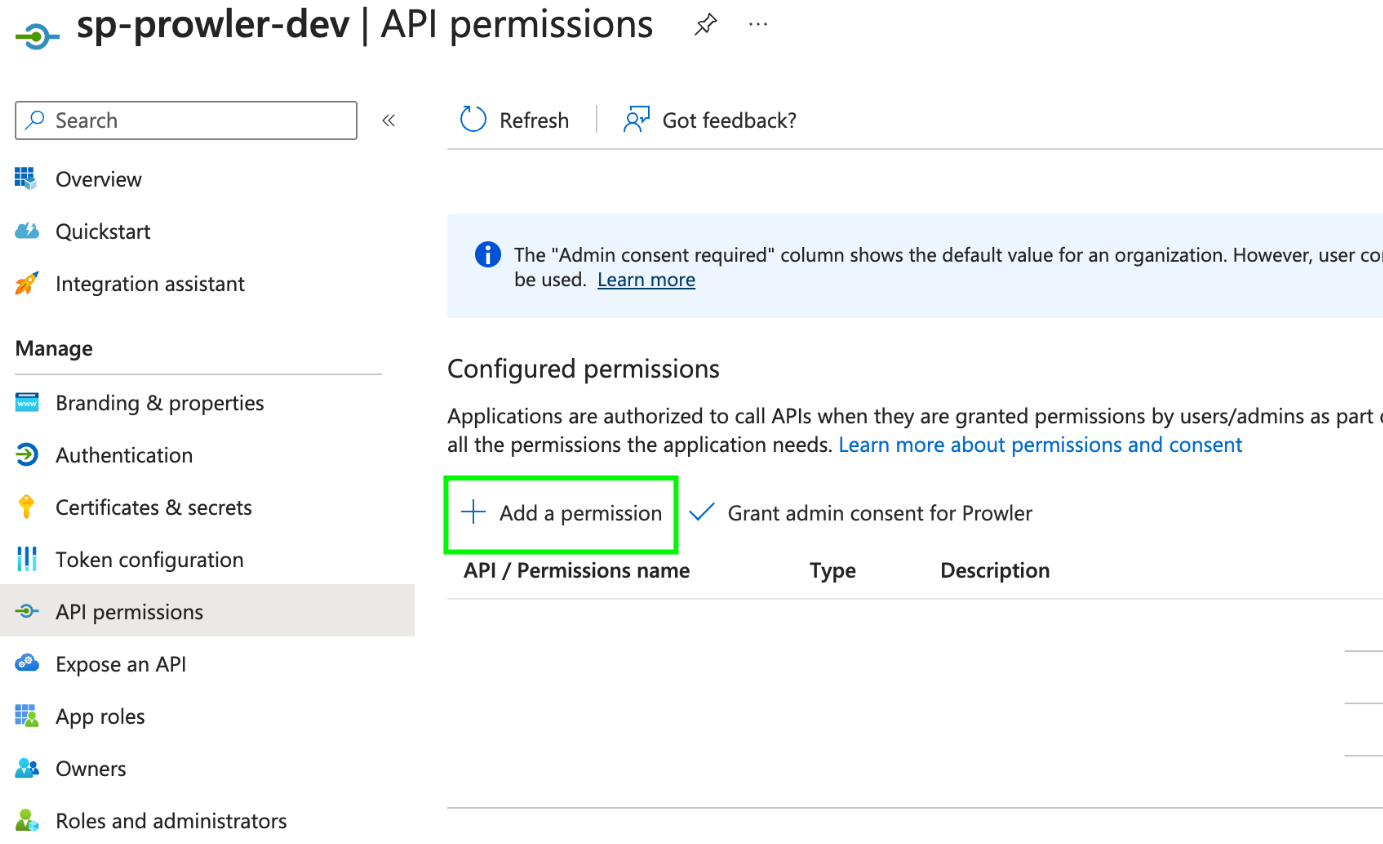
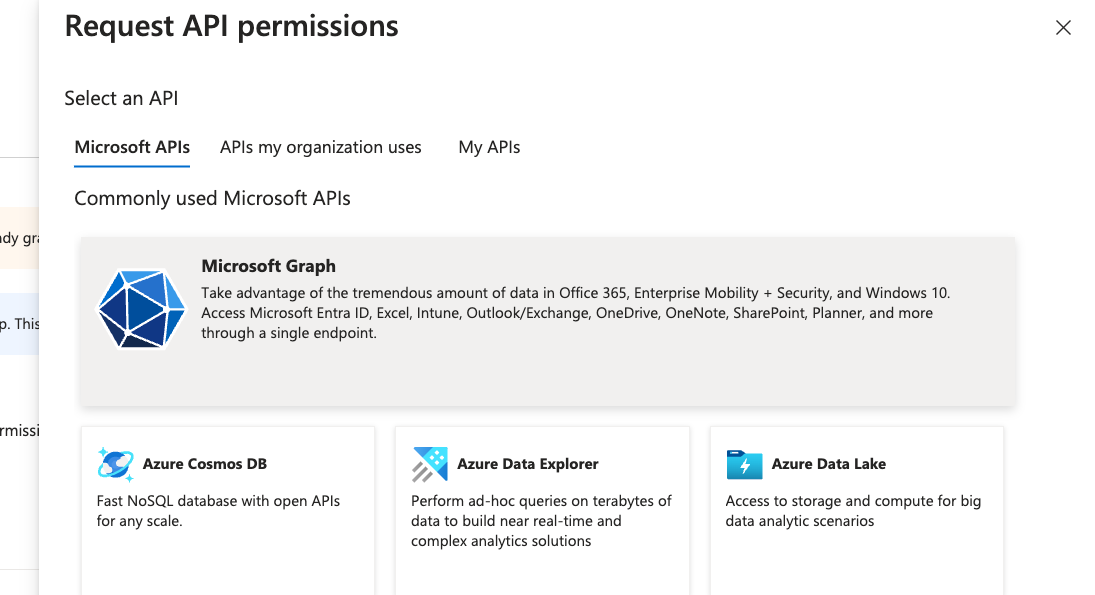
- Search and select the following permissions:
Directory.Read.AllPolicy.Read.AllUserAuthenticationMethod.Read.All
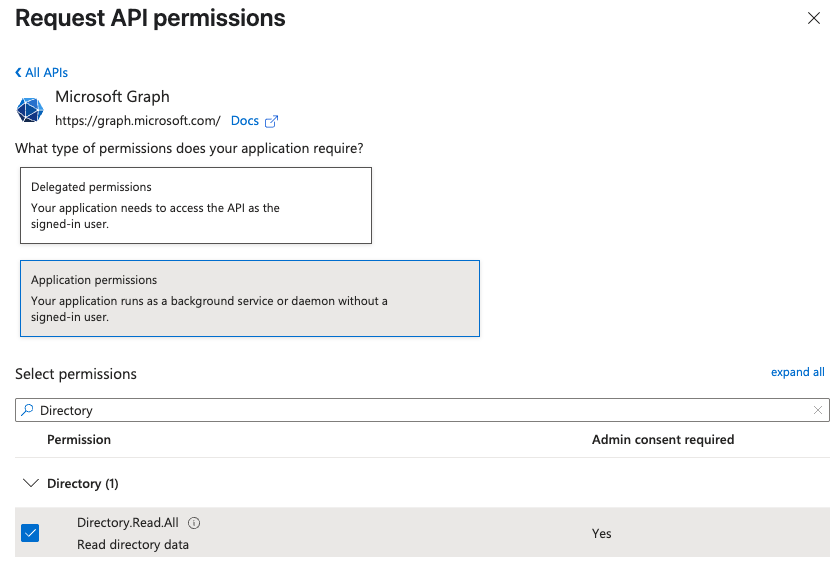
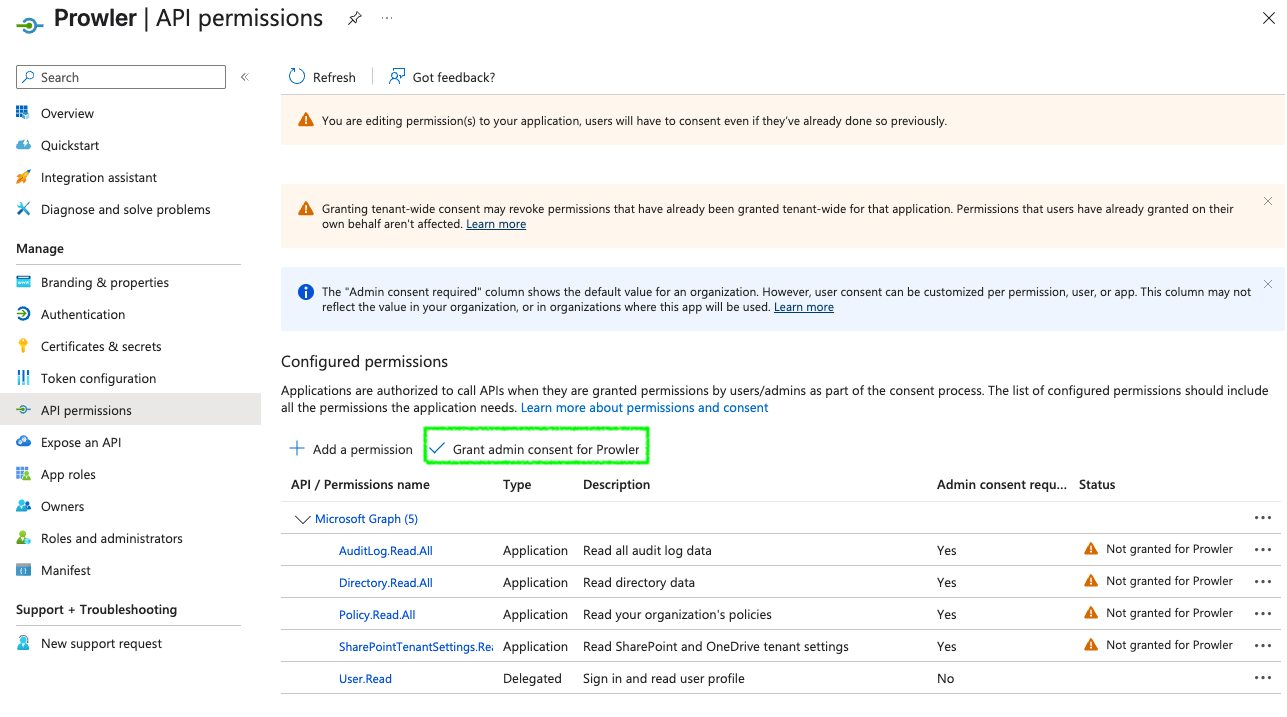
- Click "Add permissions", then grant admin consent
Subscription Scope Permissions
These RBAC roles must be assigned per subscription to perform security checks:
Reader– Grants read-only access to Azure resourcesProwlerRole– Custom role with minimal permissions for specific checks
Assigning "Reader" Role at the Subscription Level:
- Navigate to the subscription you want to audit
- In the left menu, select "Access control (IAM)"
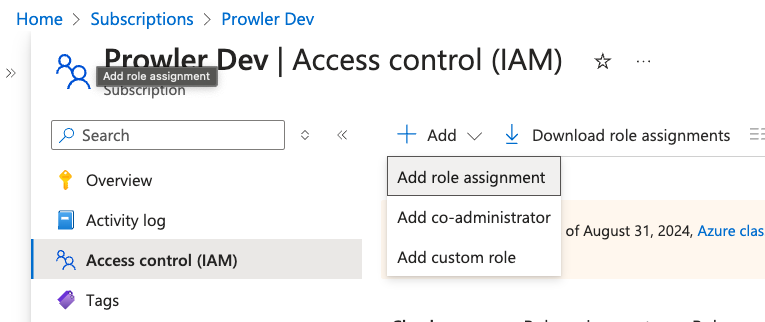
- Click "+ Add" and select "Add role assignment"
- Search for "Reader", select it and click "Next"
- In the "Members" tab, click "+ Select members", then add the accounts
- Click "Review + assign" to finalize the role assignment
Assigning "ProwlerRole" Permissions:
- Download the Prowler Azure Custom Role JSON file
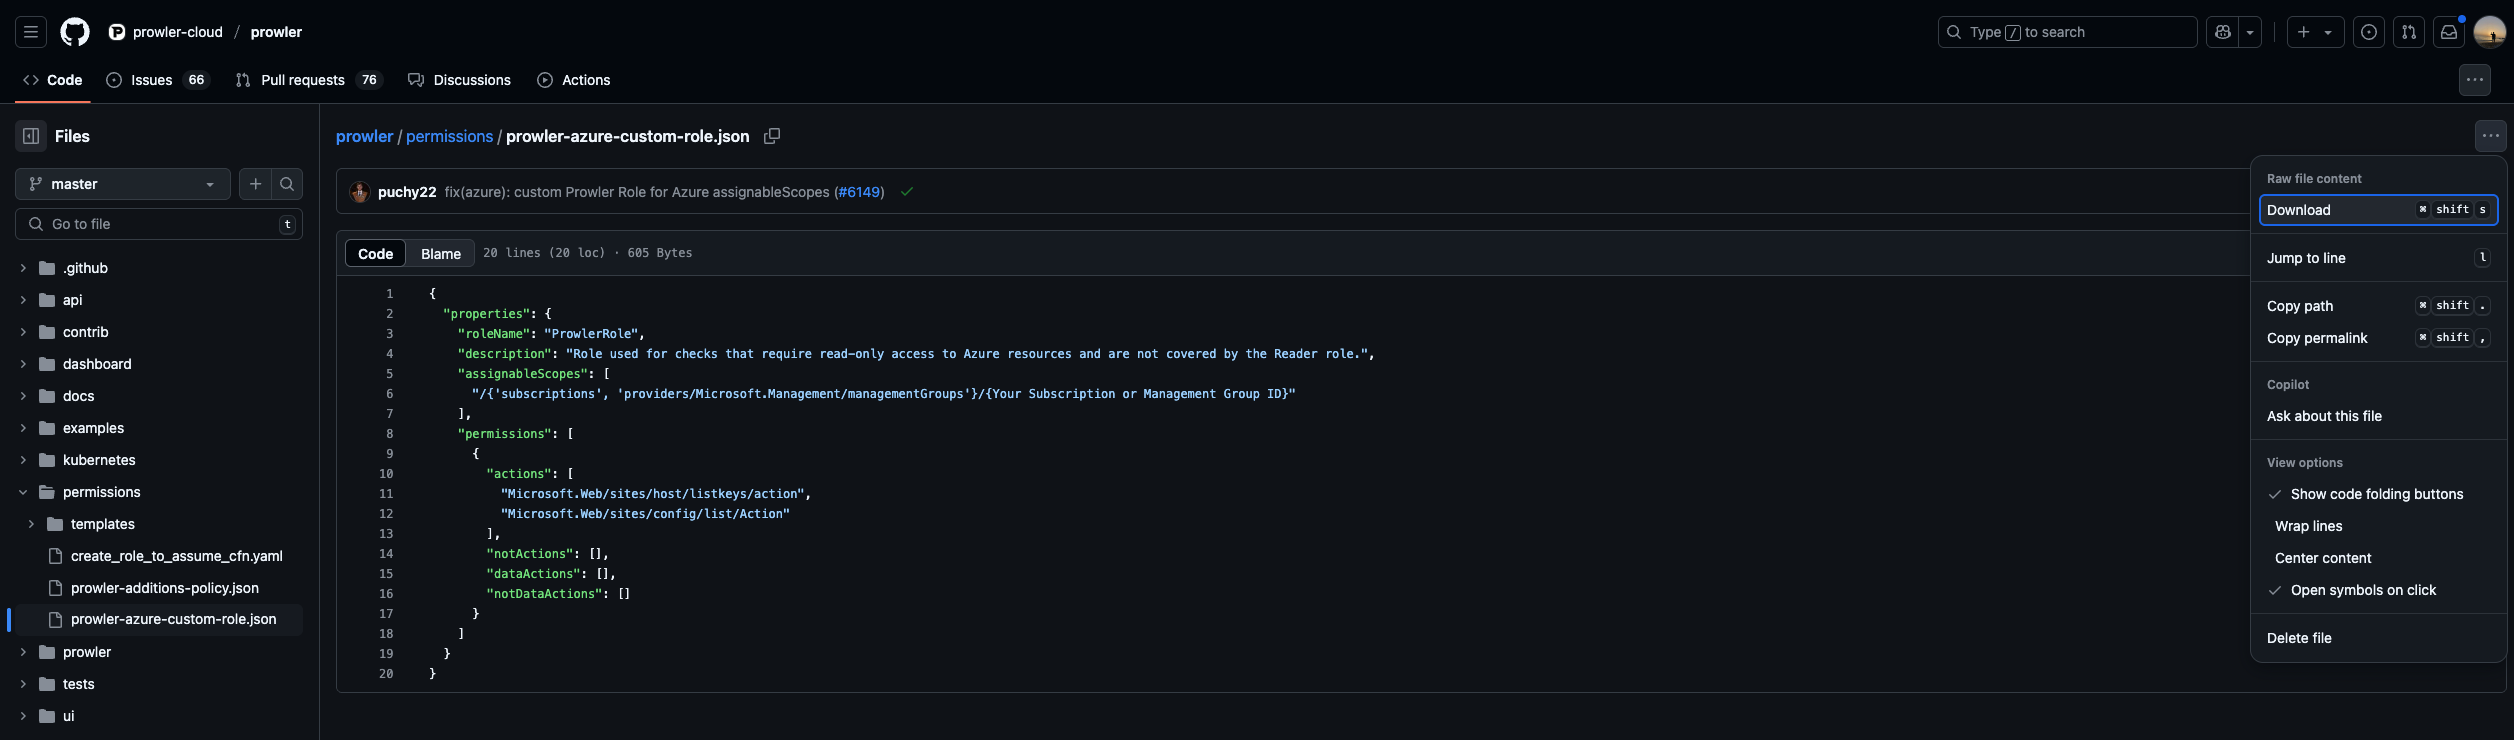
- Modify "assignableScopes" to match your Subscription ID
- Go to your Azure Subscription > "Access control (IAM)"
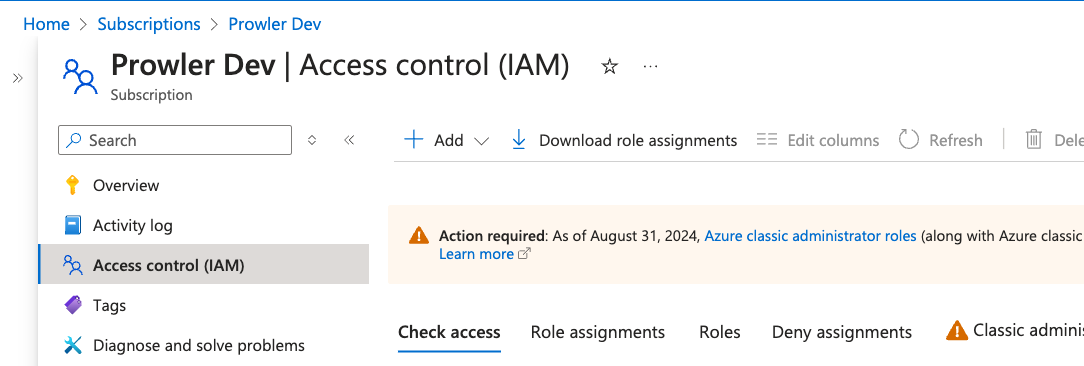
- Click "+ Add" > "Add custom role", choose "Start from JSON" and upload the file
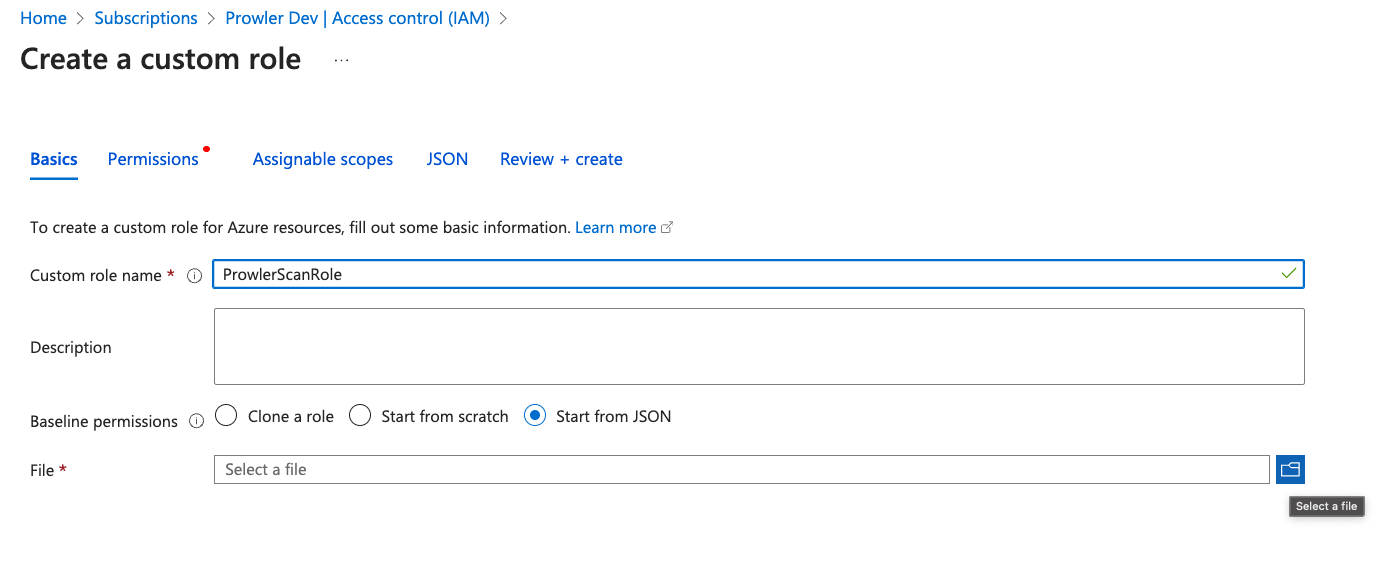
- Click "Review + Create" to finish

- Return to "Access control (IAM)" and assign both Reader and ProwlerRole to your service principal
Creating the Service Principal
For detailed instructions on creating a service principal with the required credentials, visit the official documentation.
View Creating Prowler Service Principal GuideThis guide covers setting up app registration and permissions for Microsoft 365 security scanning.
Create Application Registration
- Access Microsoft Entra ID (Microsoft Entra ID)

- Navigate to "Applications" > "App registrations" (App Registrations)
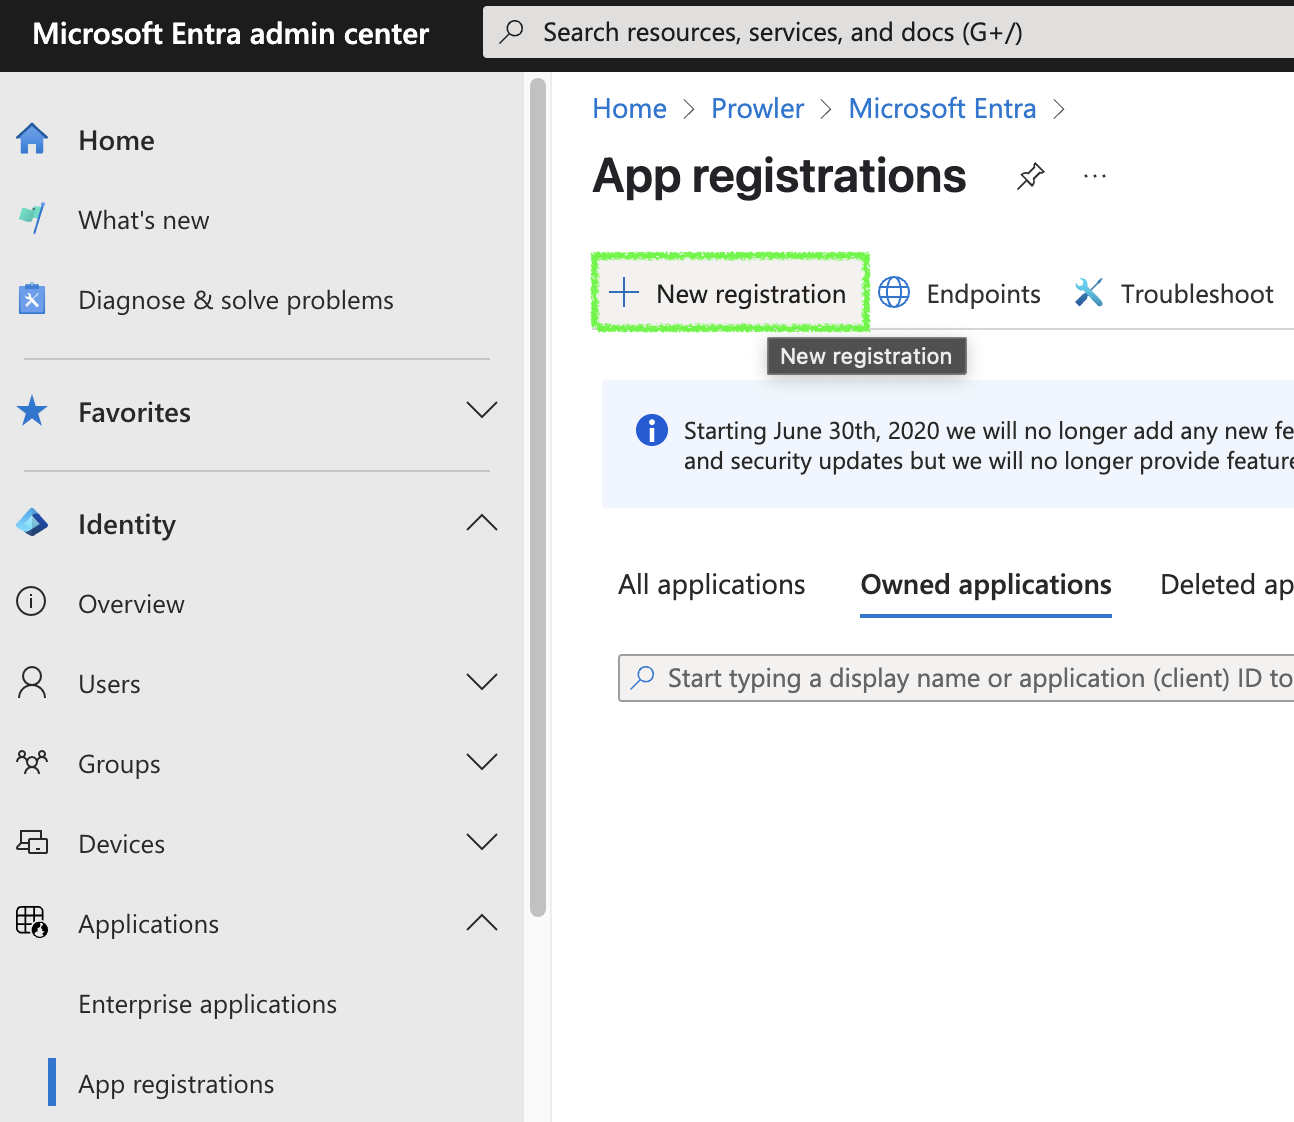
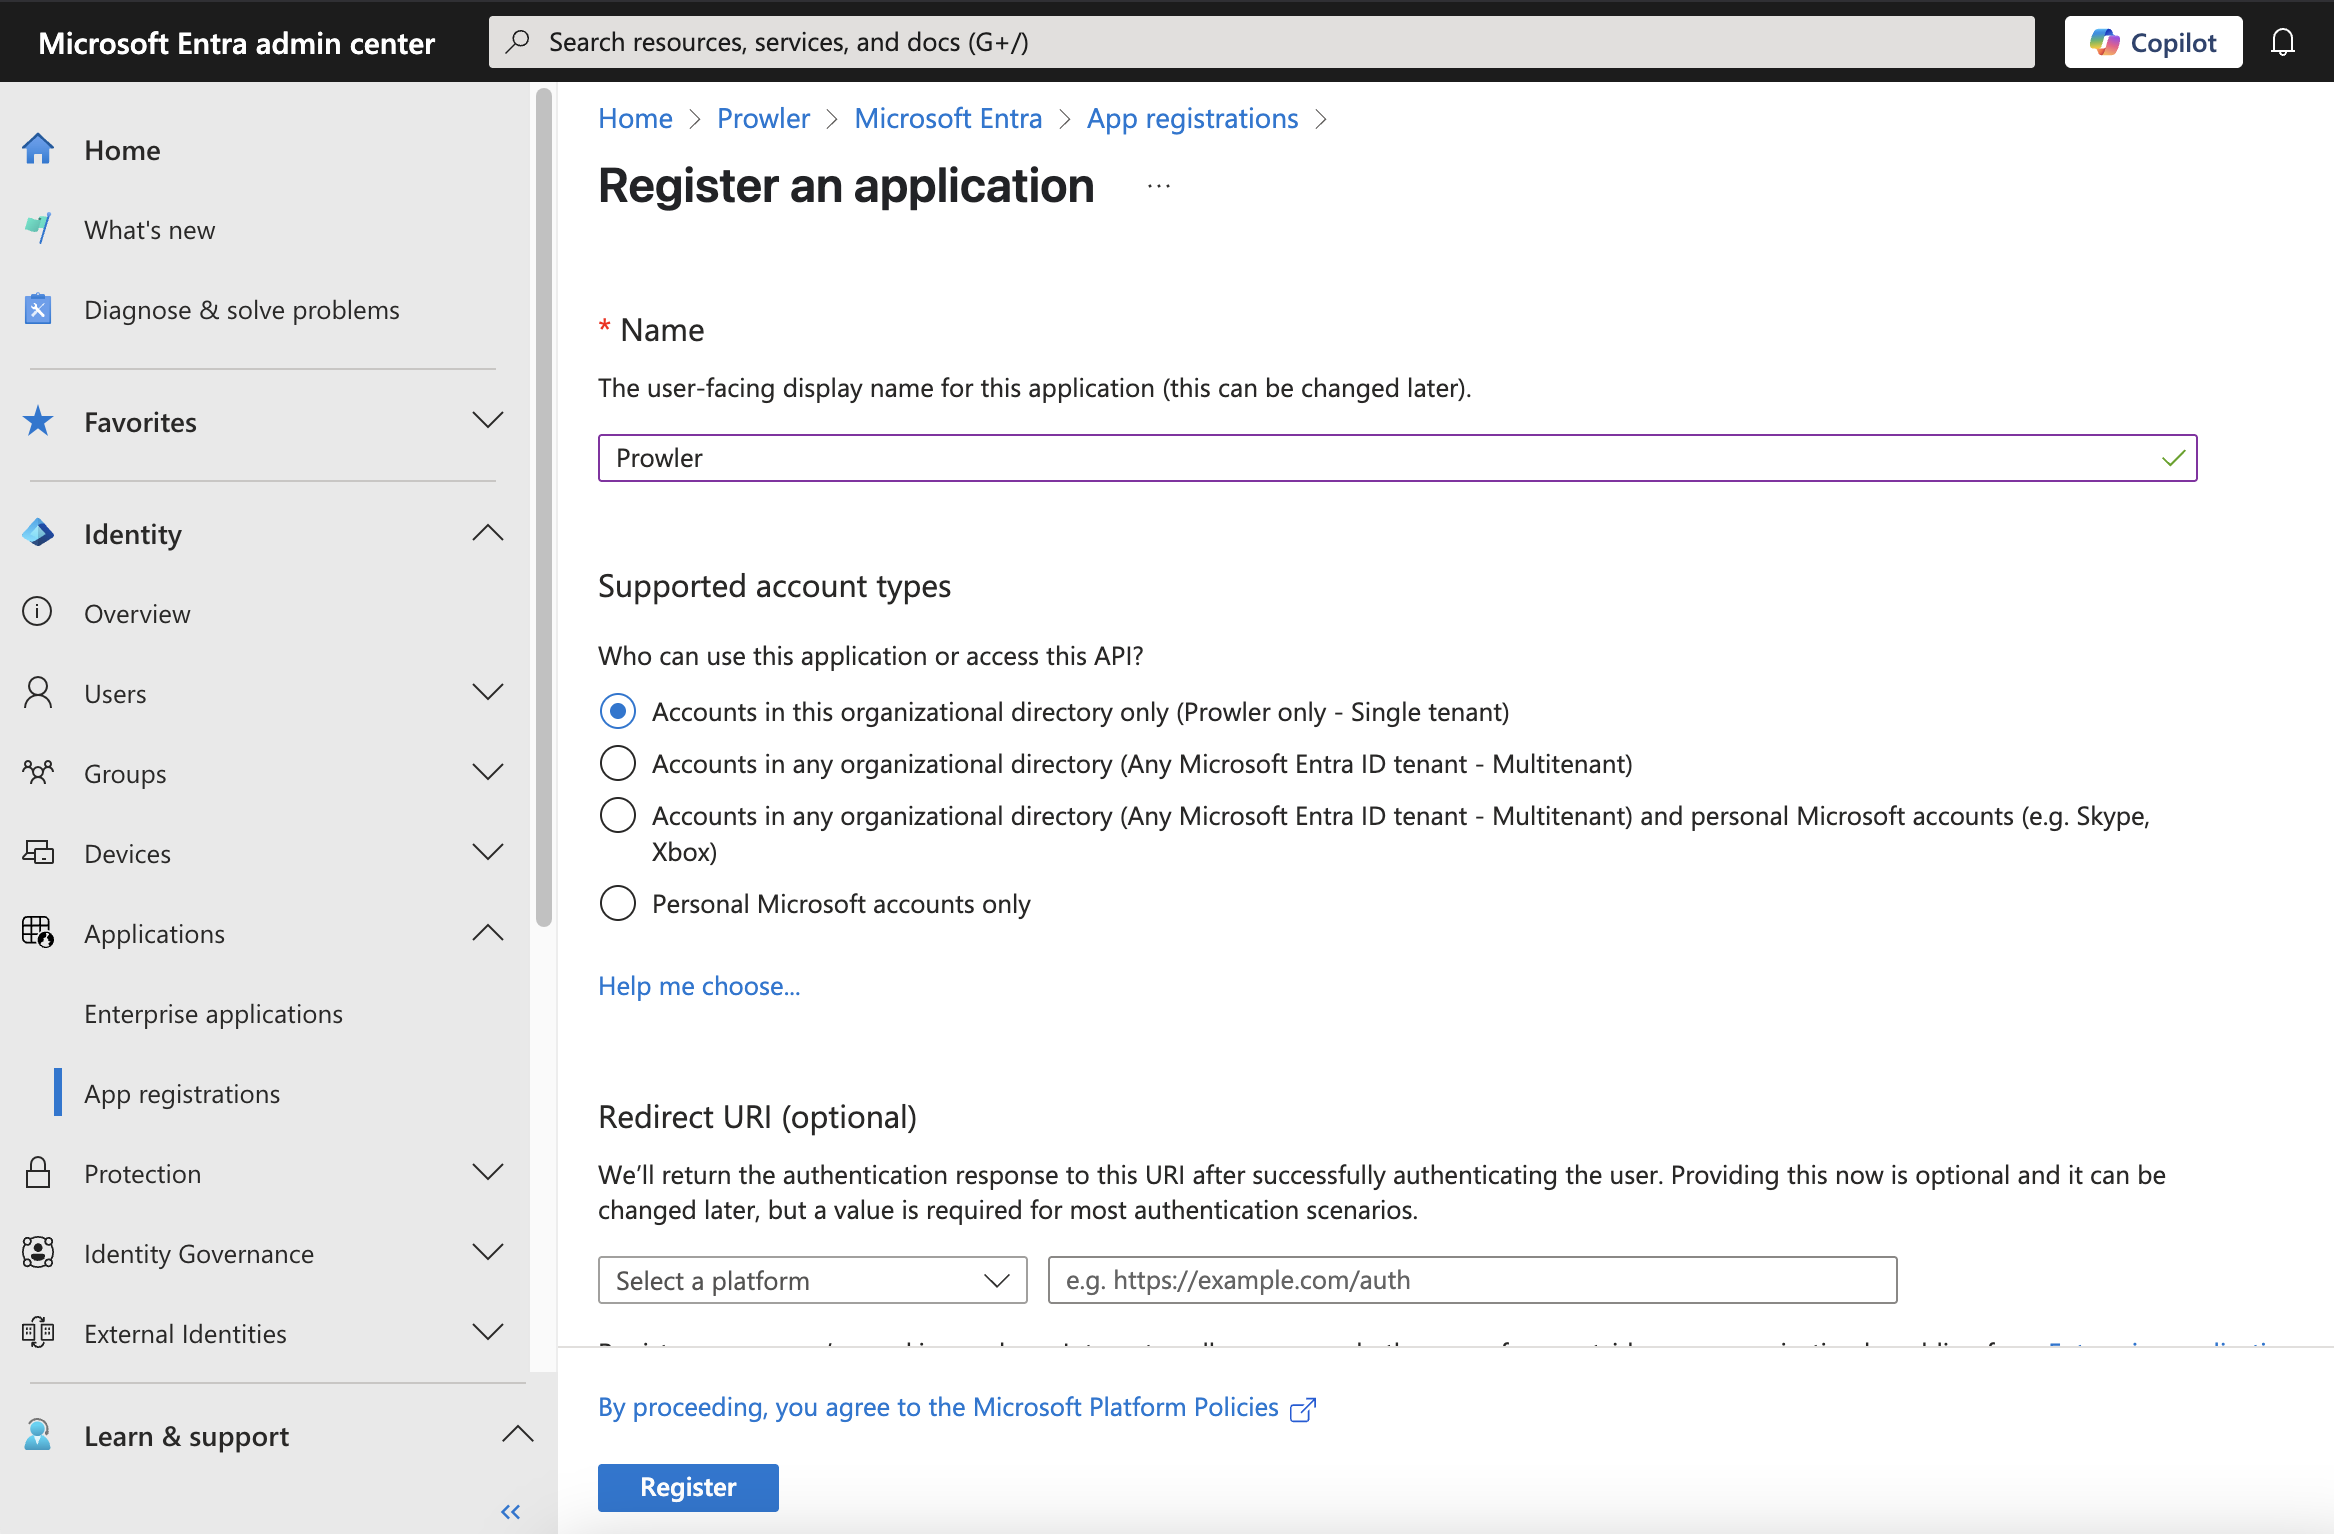
- Click "+ New registration", complete the form, and click "Register"
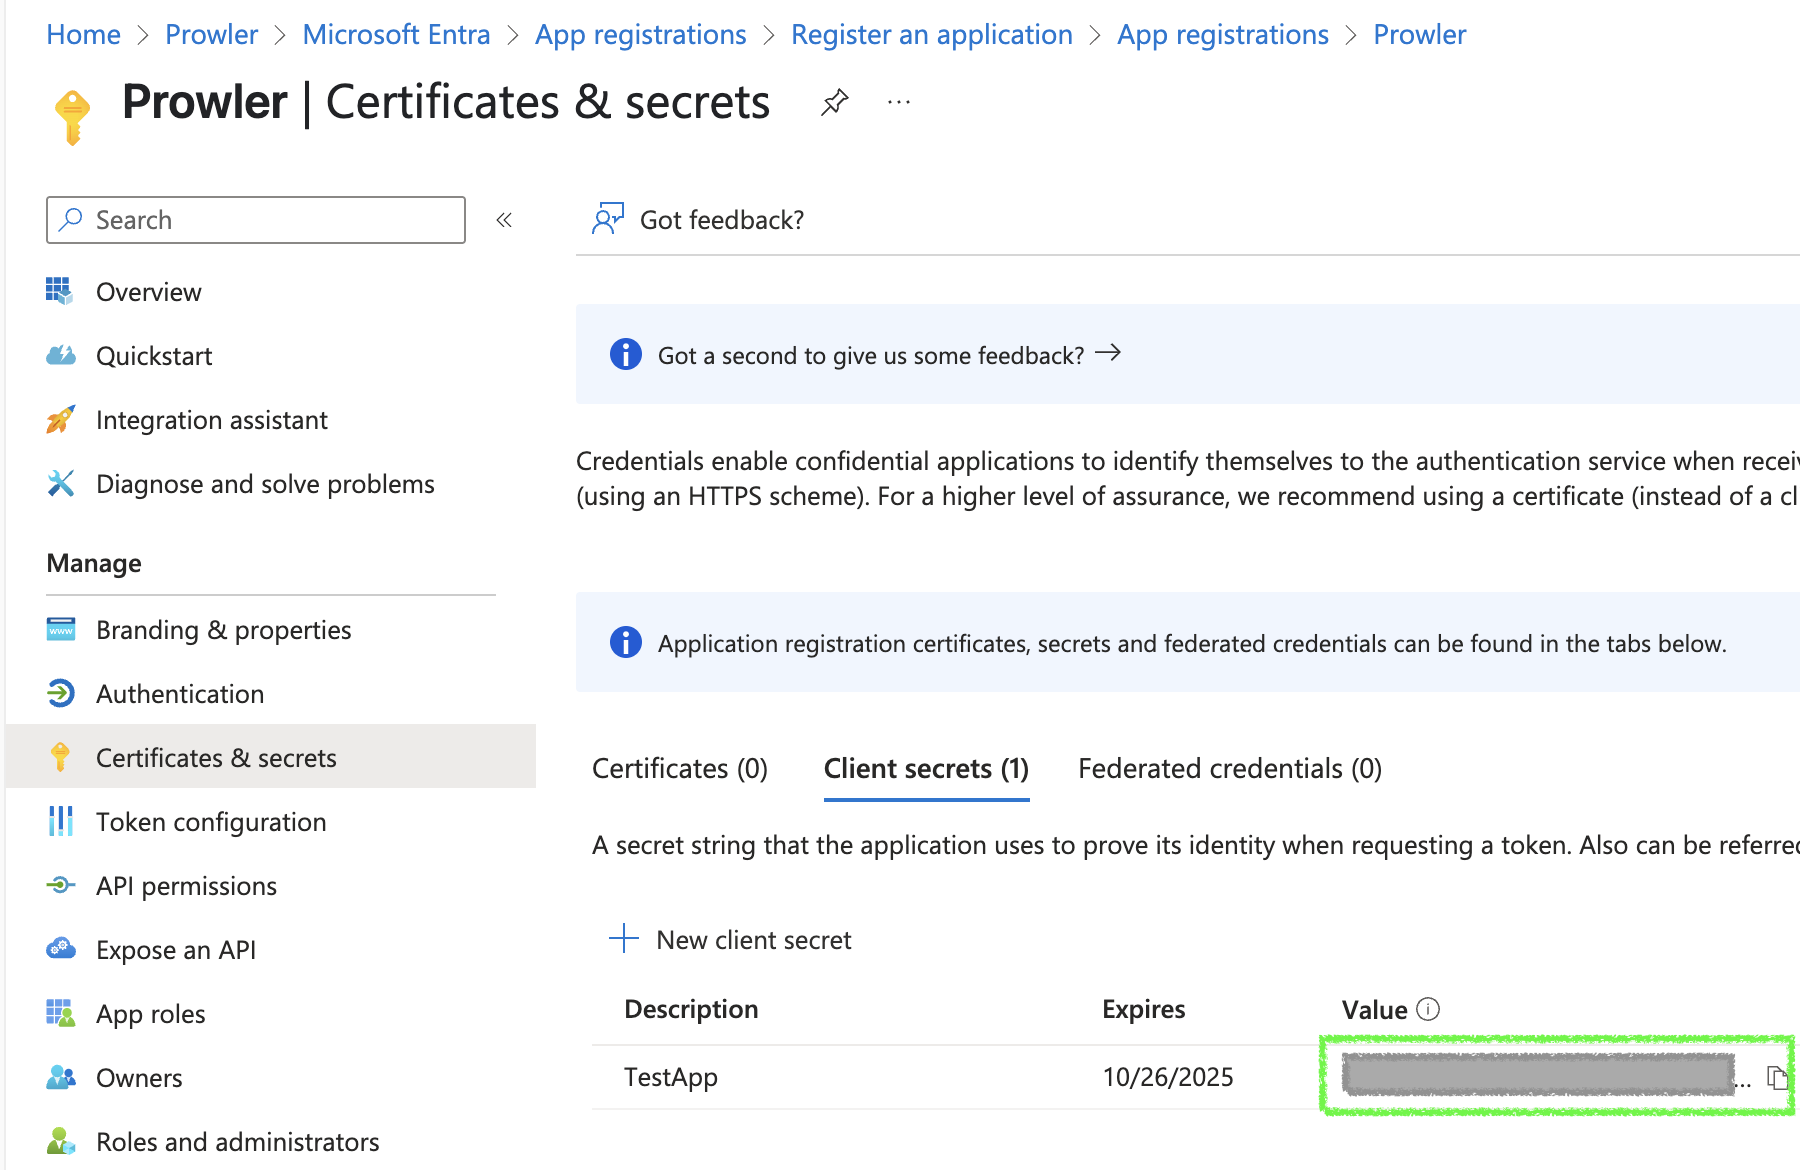
- Go to "Certificates & secrets" > "Client secrets" > "+ New client secret"
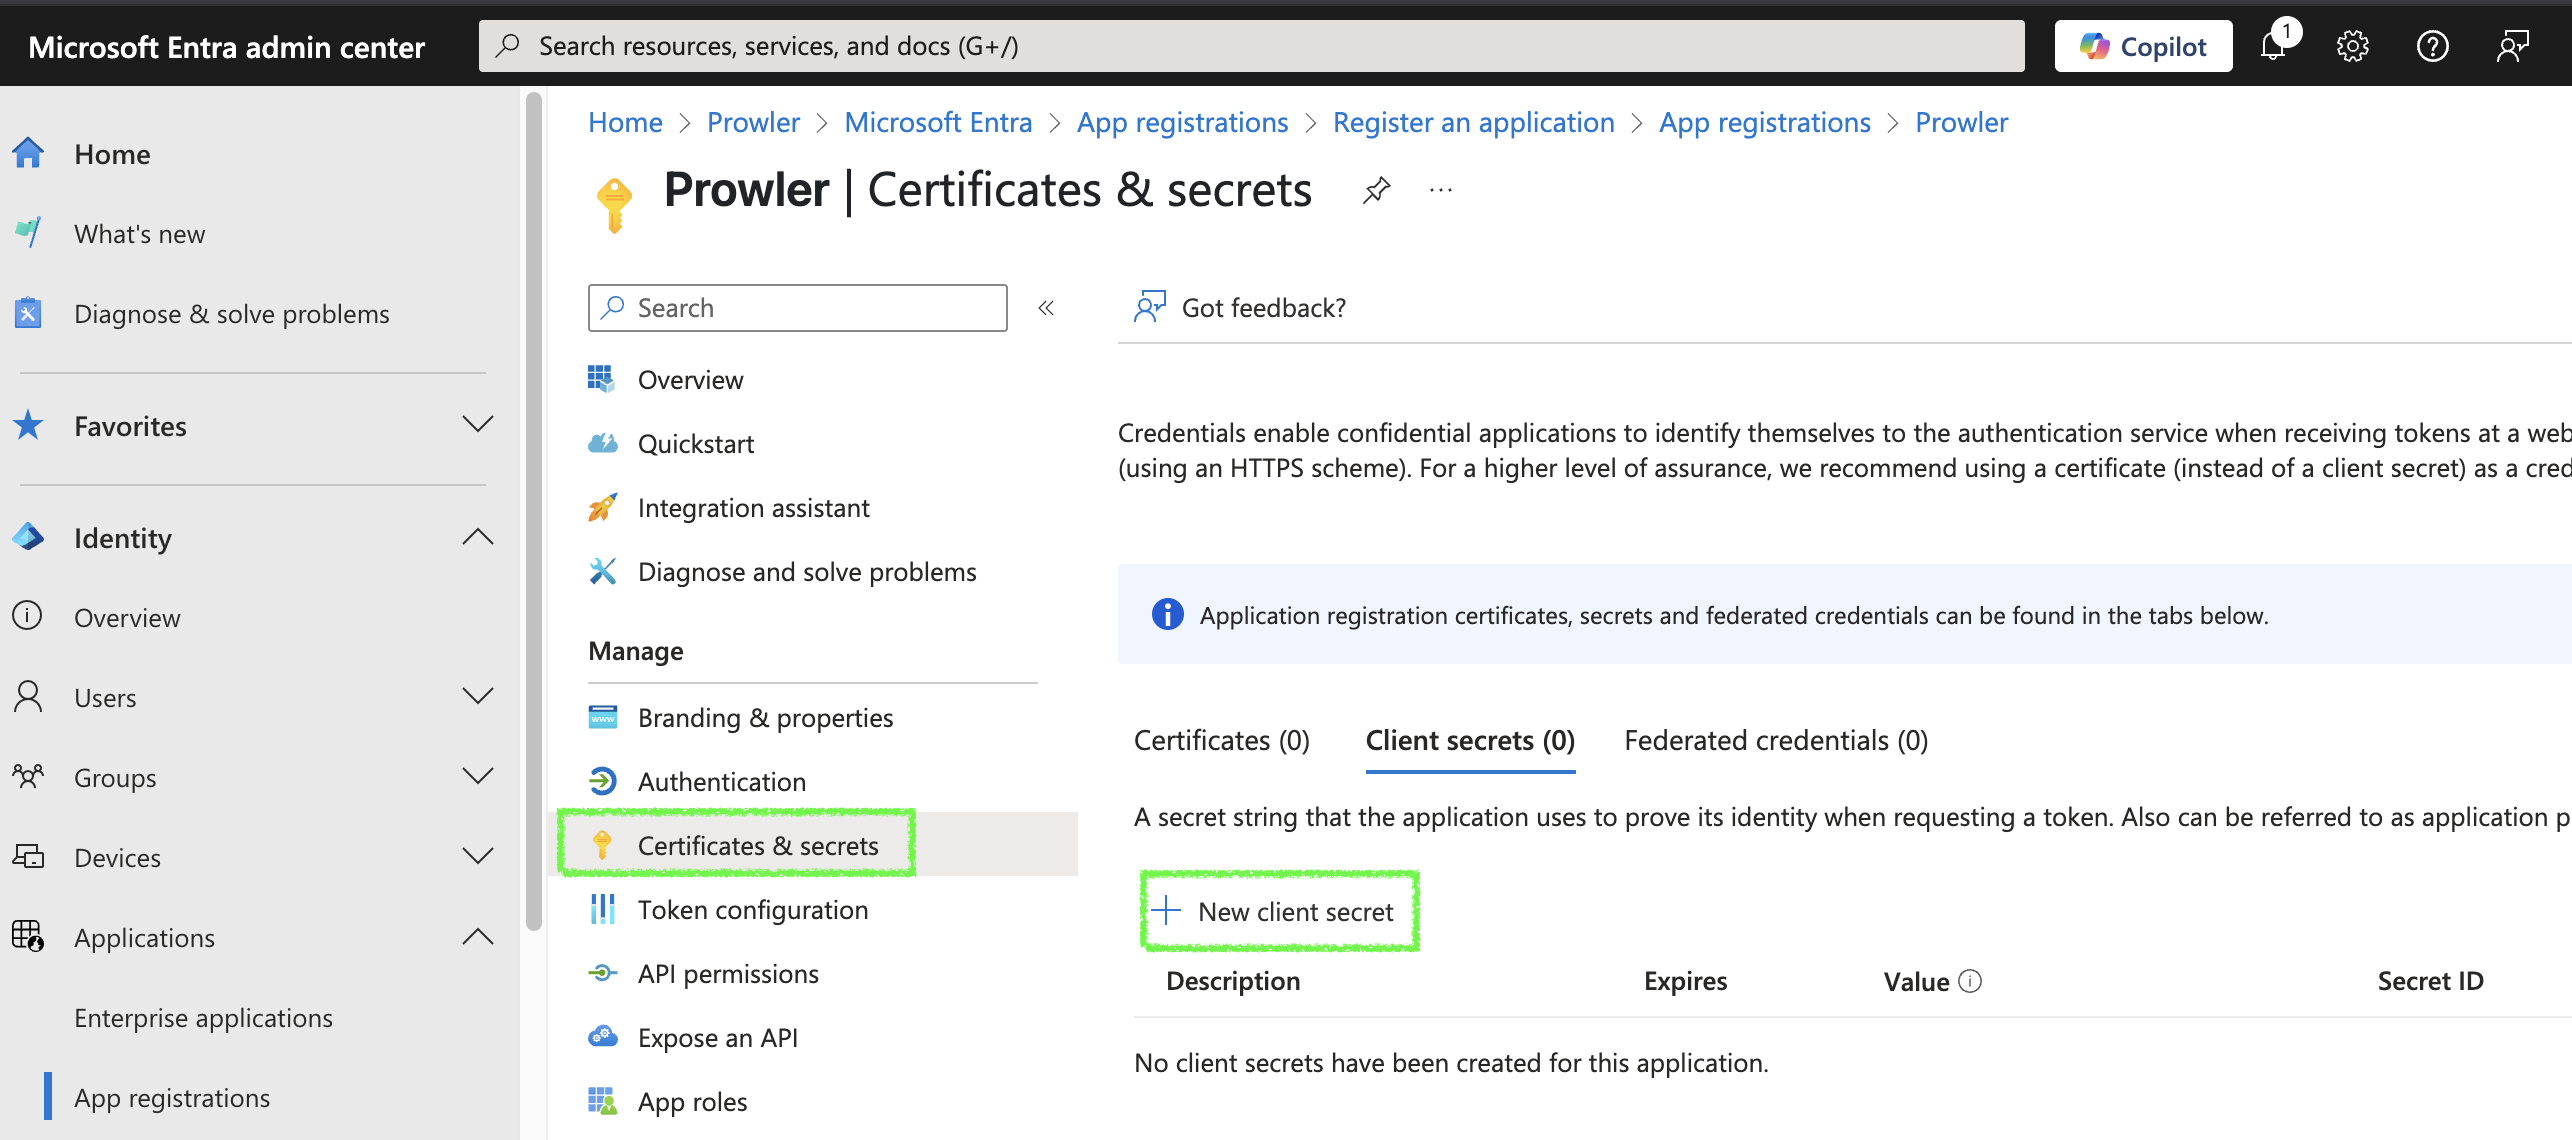
- Fill in the required fields and click "Add", then copy the generated value
Grant Microsoft Graph API Permissions
- Go to App Registration > Select your app > click on "API permissions"
- Click "+ Add a permission" > "Microsoft Graph" > "Application permissions"
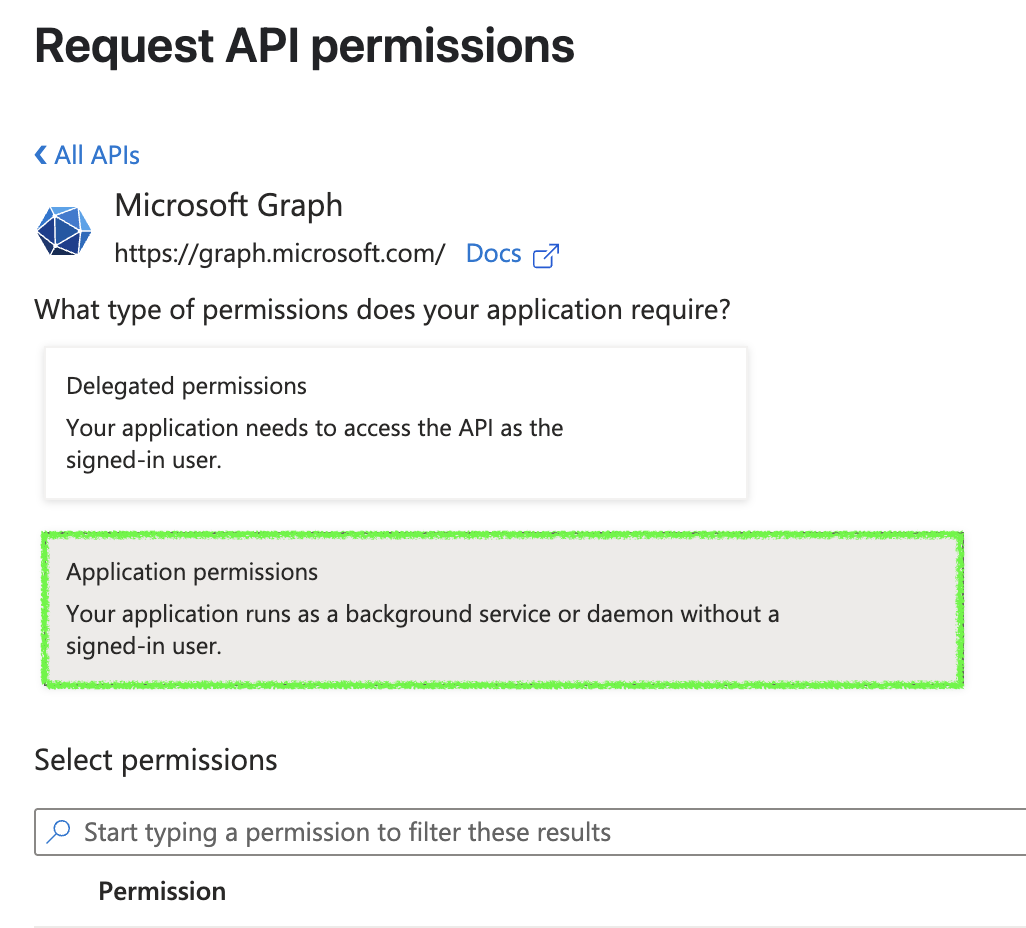
- Search and select the required permissions:
AuditLog.Read.AllDirectory.Read.AllPolicy.Read.AllSharePointTenantSettings.Read.All

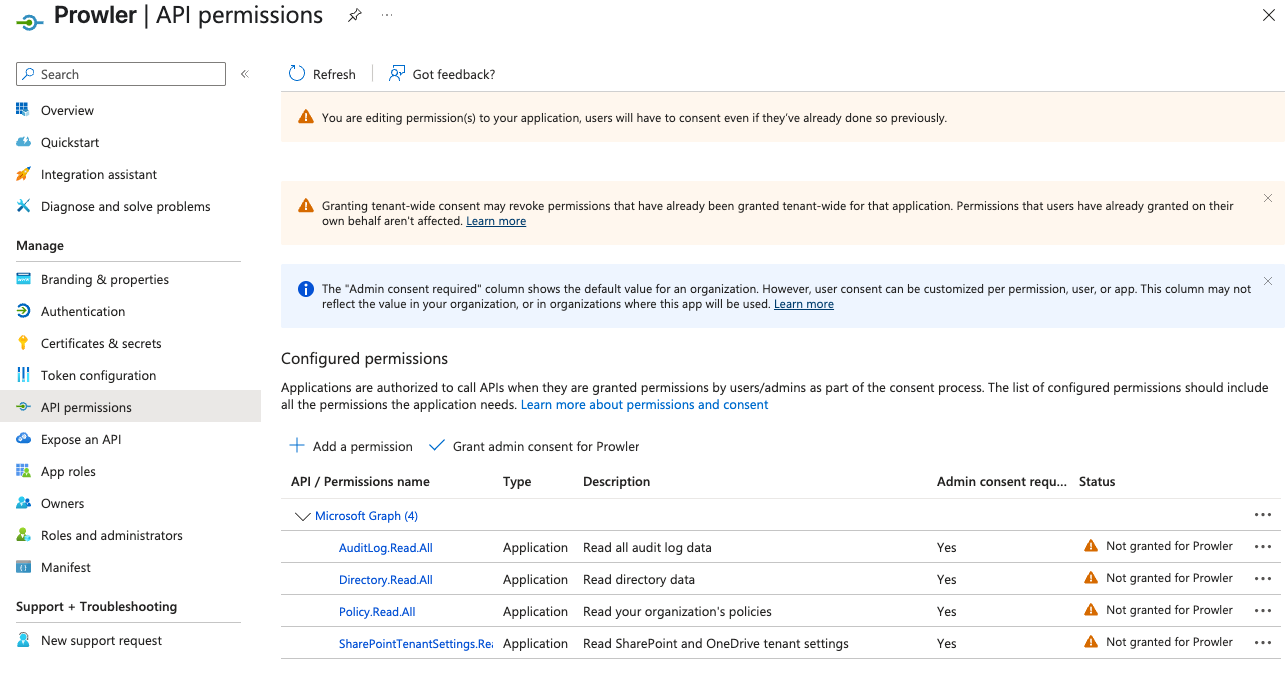
- Click "Add permissions", then click "Grant admin consent"
Grant PowerShell Module Permissions
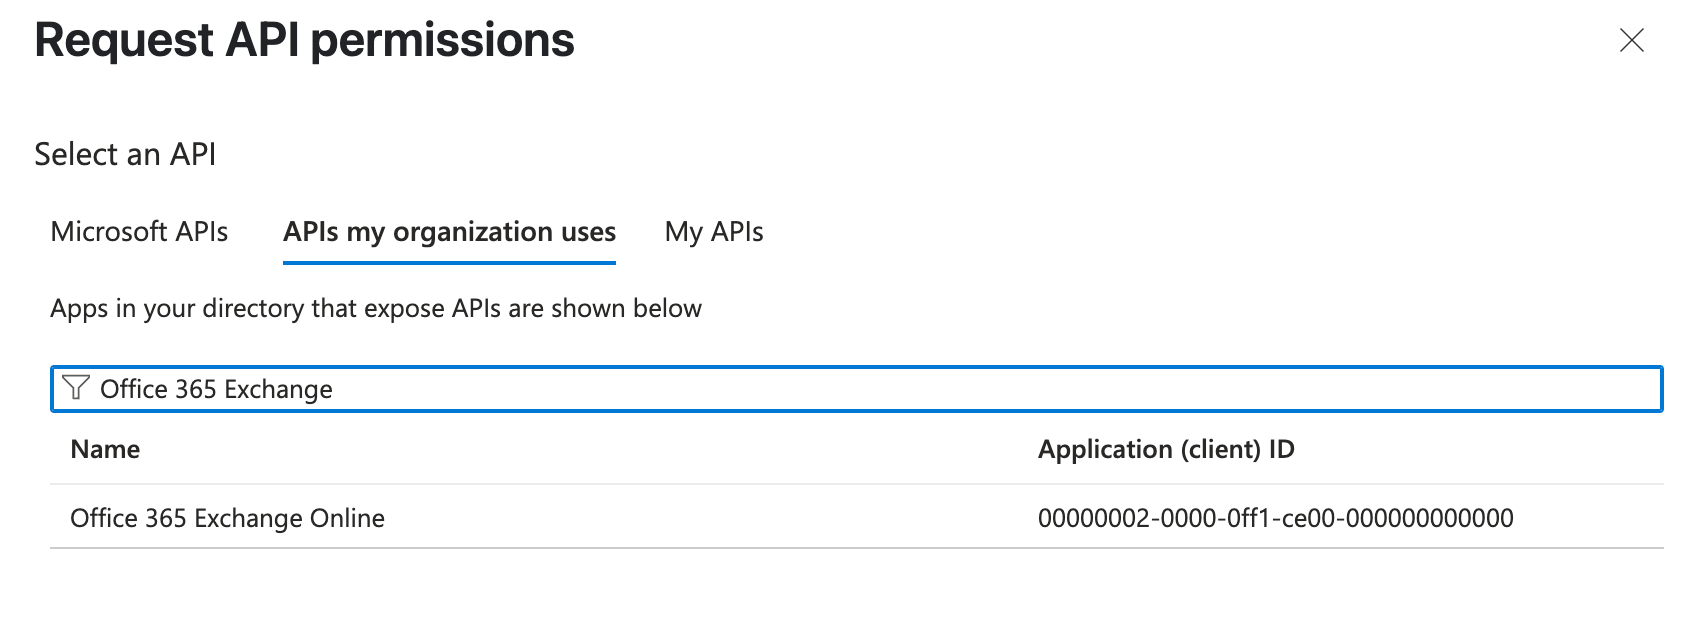
Add Exchange API:
- Search and select "Office 365 Exchange Online" API
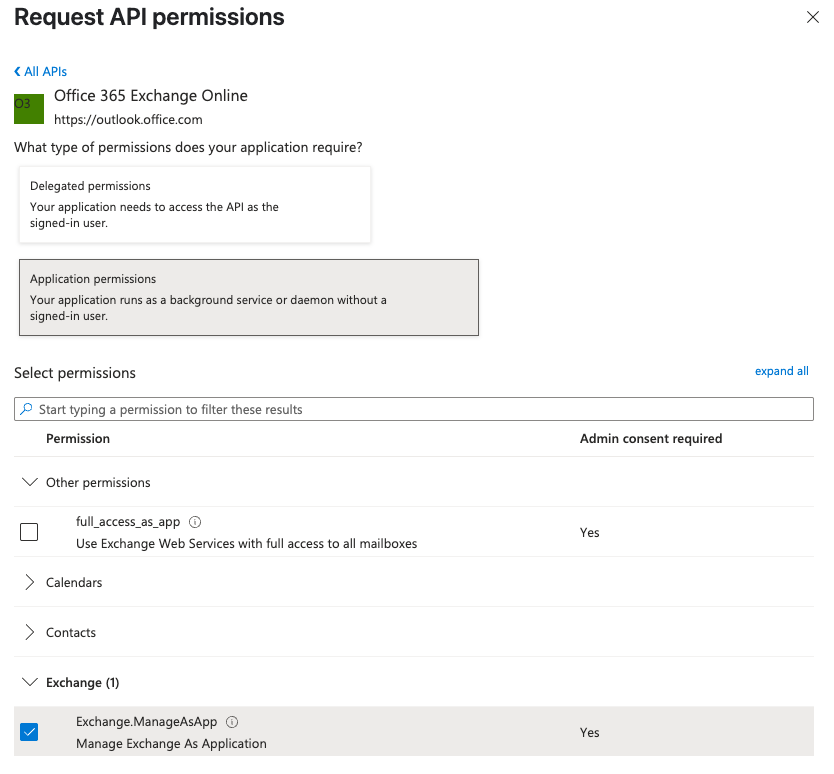
- Select "Exchange.ManageAsApp" permission and click "Add permissions"
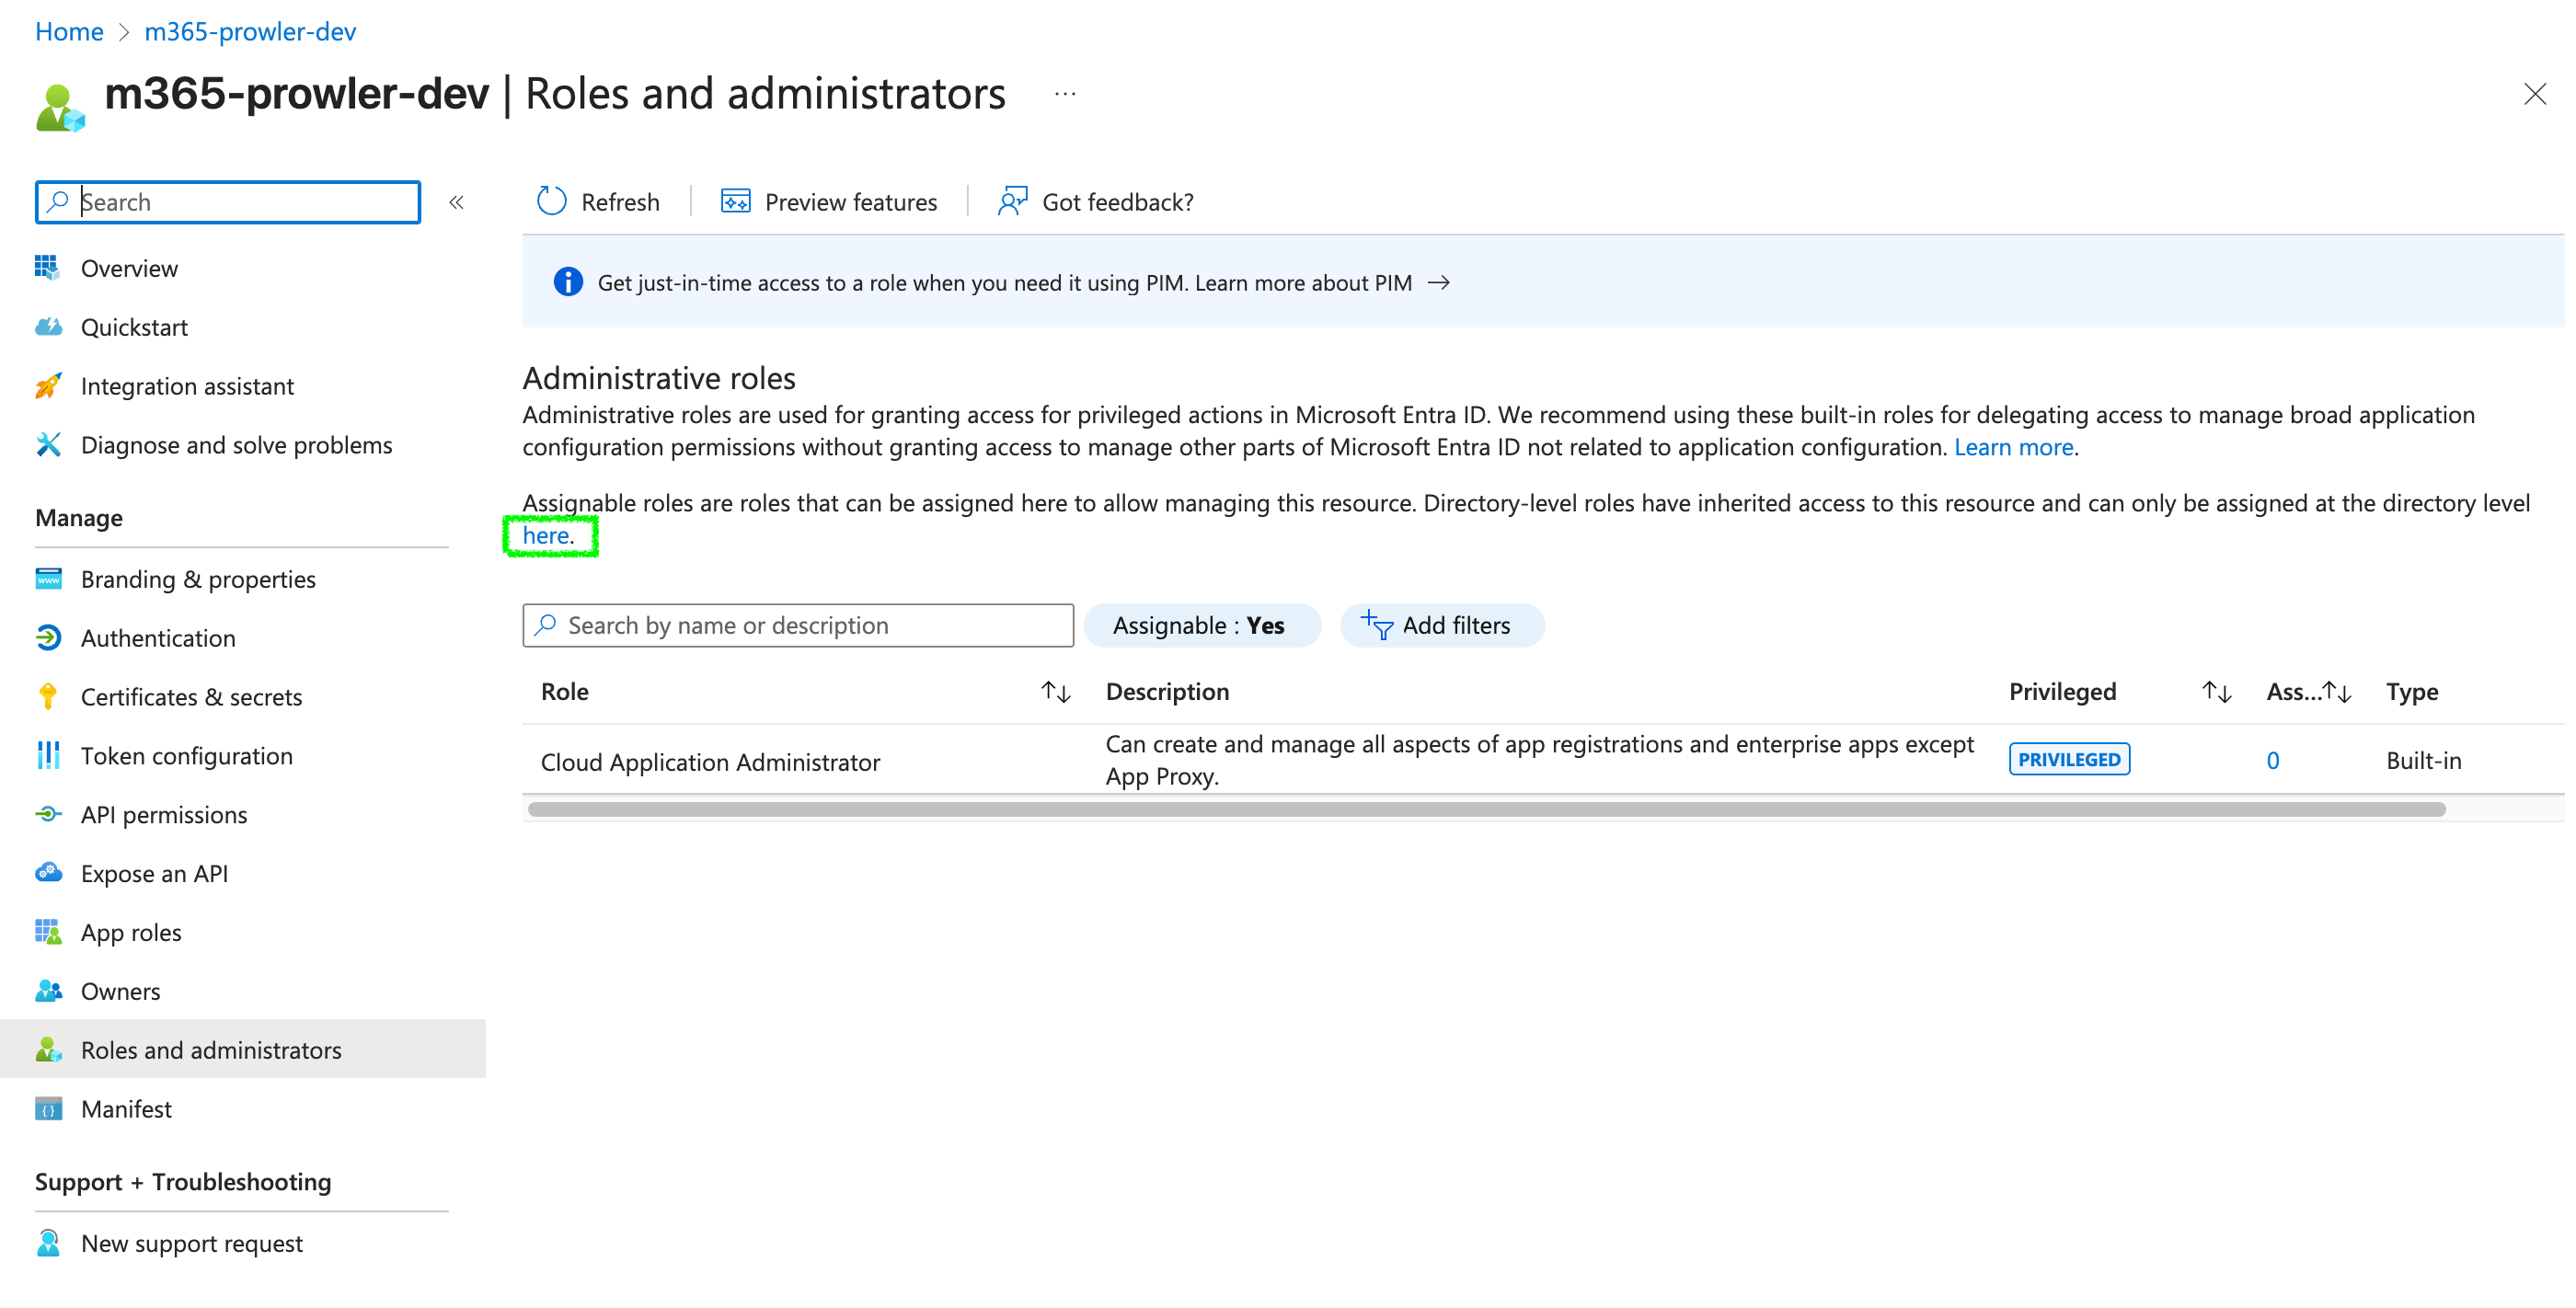
- Assign Global Reader role to the app via "Roles and administrators"

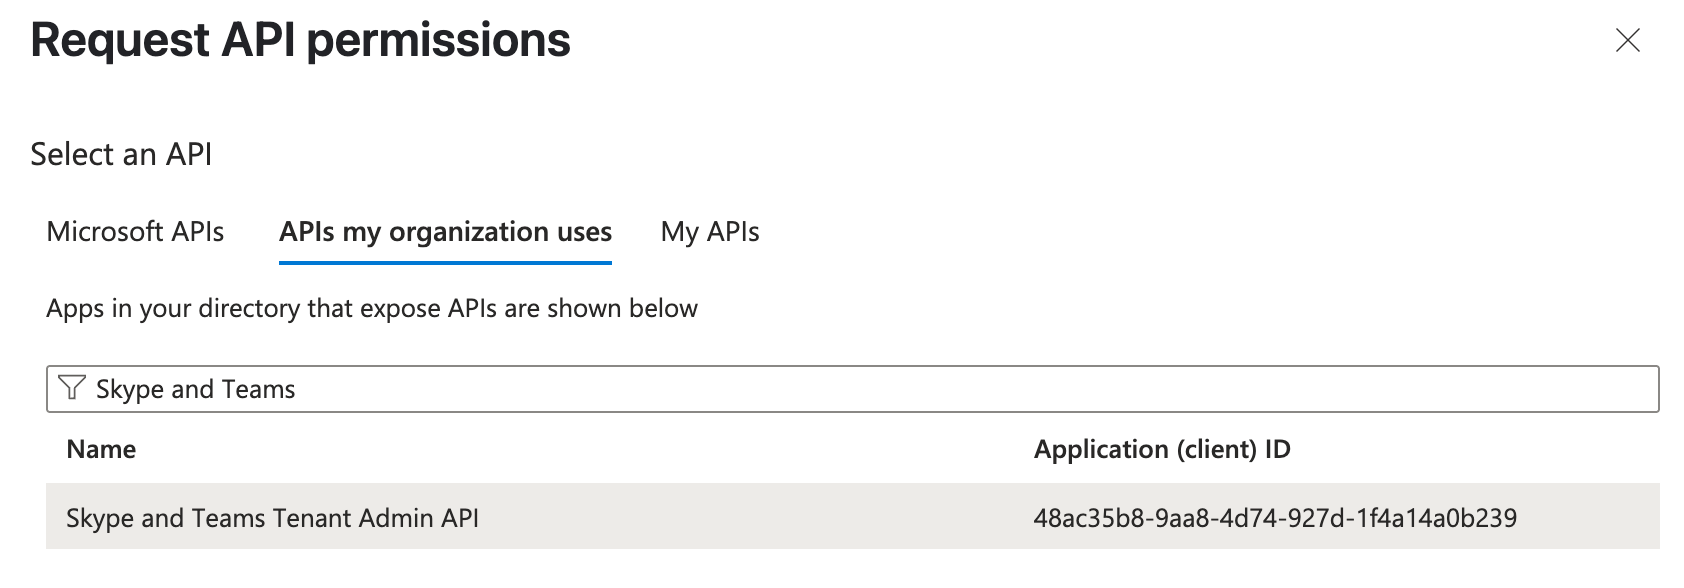
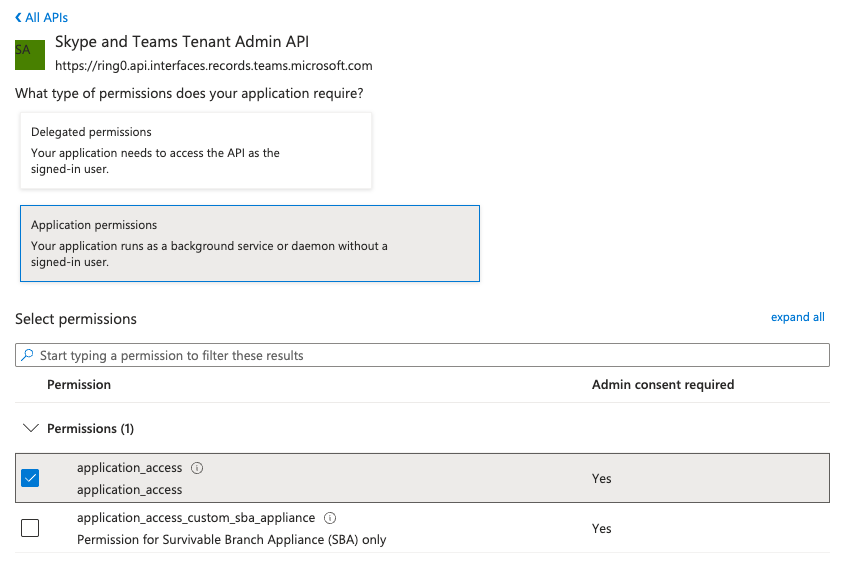
Add Teams API:
- Search and select "Skype and Teams Tenant Admin API"
- Select "application_access" permission and click "Add permissions"
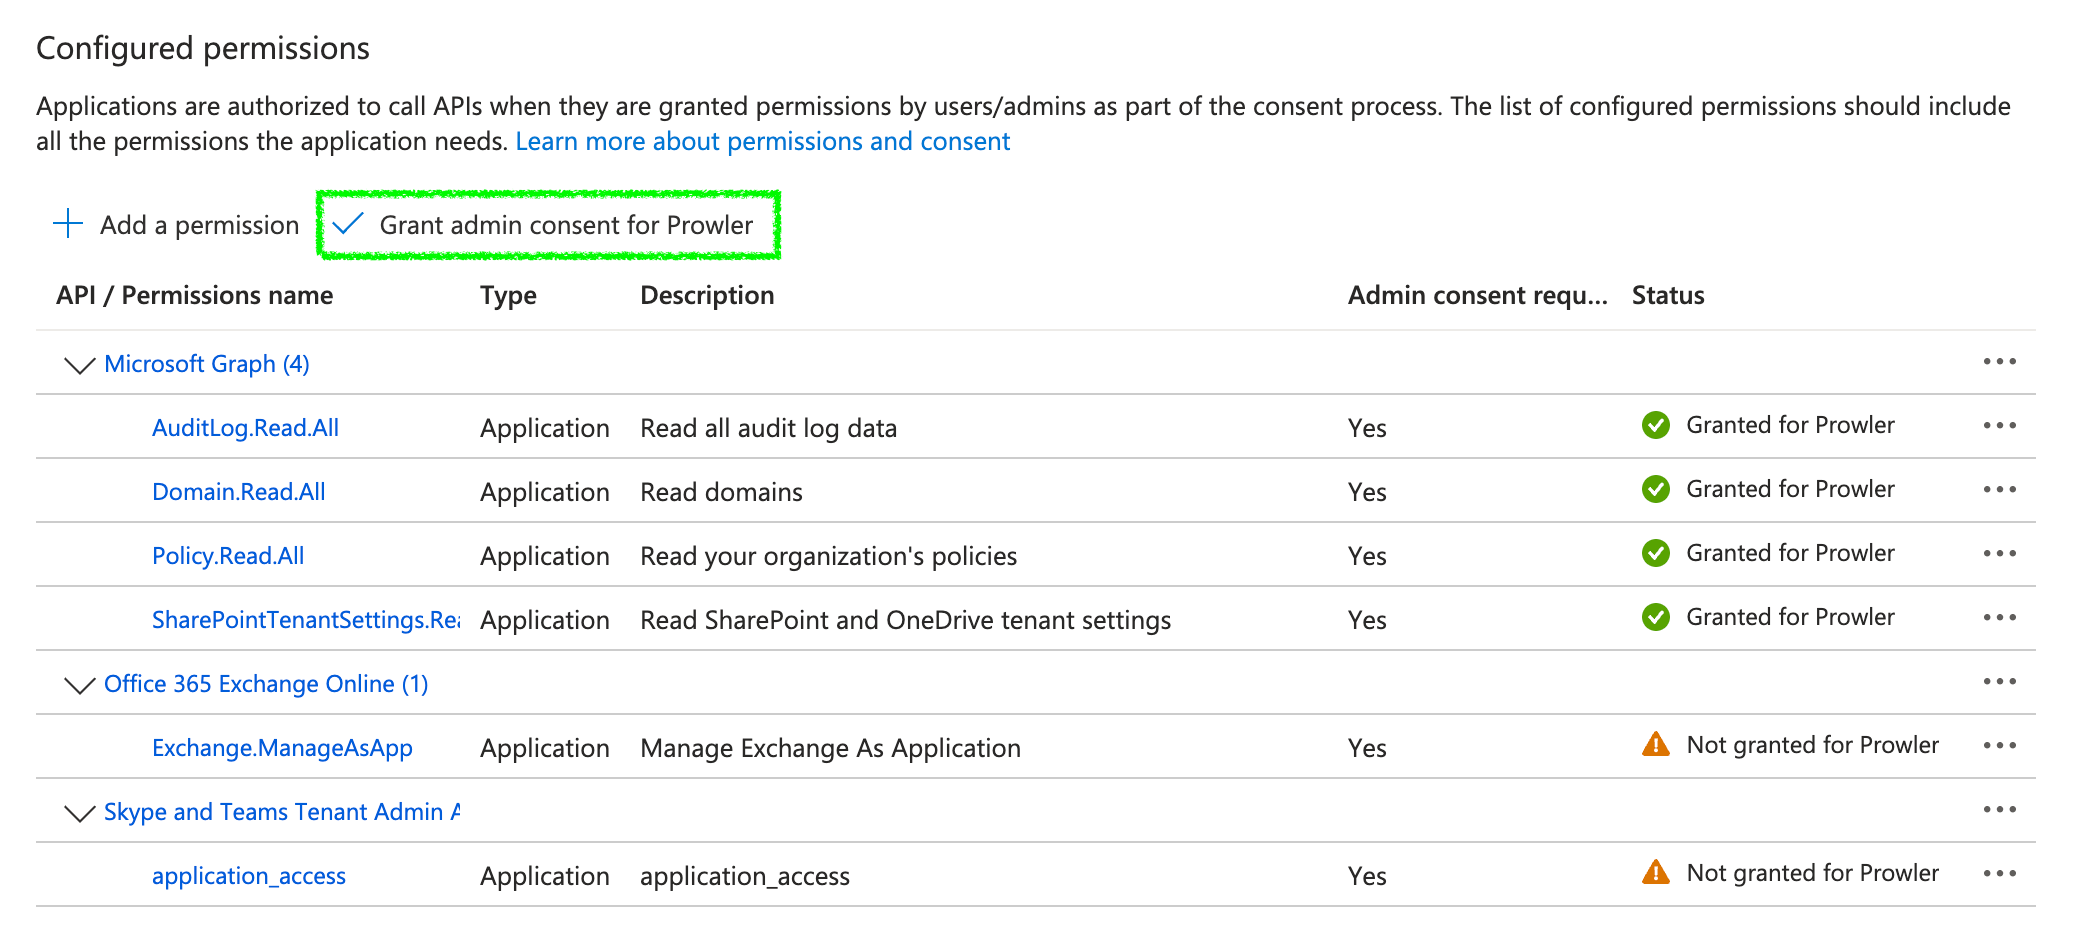
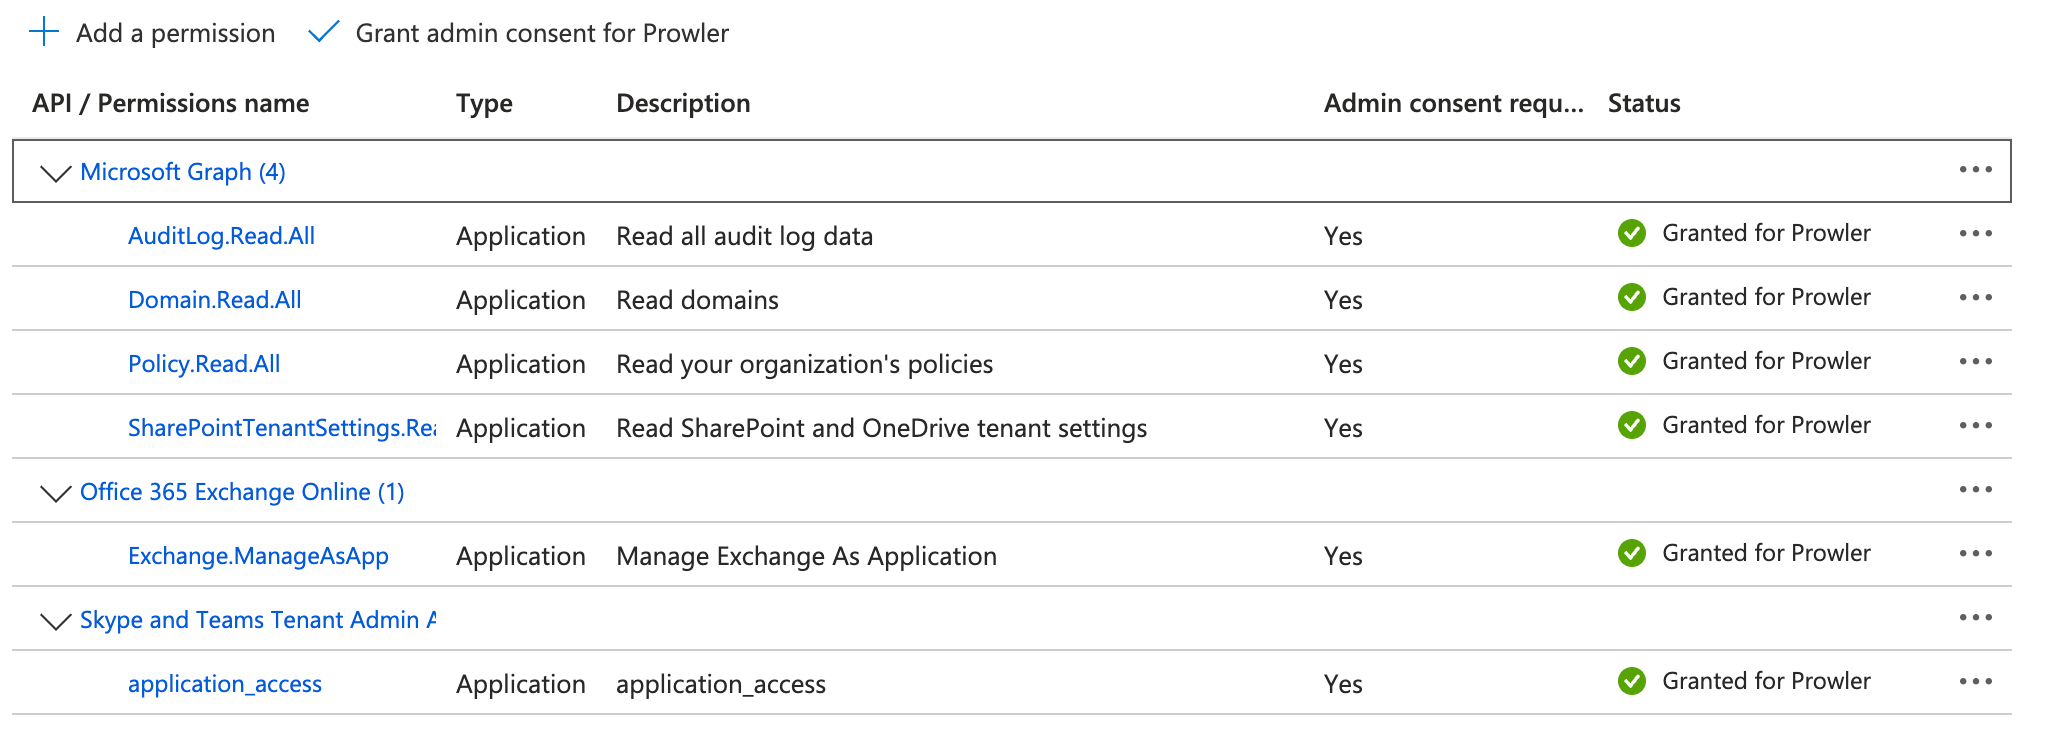
Click "Grant admin consent" to grant admin consent for all permissions
Certificate-based authentication replaces the client secret with an X.509 certificate. This is the recommended approach for production environments.
Generate the Certificate
Use OpenSSL to create a private key and self-signed certificate (macOS/Linux):
Important: Guard prowlerm365.key and prowlerm365.pfx files. Only upload the .cer file to Entra ID portal.
Upload the Certificate to Microsoft Entra ID
- Open Microsoft Entra ID > App registrations > your application
- Go to Certificates & secrets > Certificates
- Select Upload certificate and choose prowlerm365.cer
- Confirm the certificate appears with the expected expiration date
Encode Certificate for Prowler
Copy the resulting single-line Base64 string to use in your credentials.
Provide Certificate to Prowler
Paste the Base64-encoded PFX content in the certificate field when scanning.
This method uses a client secret for authentication. Suitable for initial setup, but certificate authentication is recommended for production.
Steps to use Client Secret Authentication:
- Complete the App Registration steps above to create your application
- In the "Certificates & secrets" section, create a new client secret and copy the value
- Use the following values when configuring the scan:
Note: Client secrets are long-lived credentials. For better security, use Certificate Authentication instead.
Trial mode - unlimited scans available. You can test all cloud providers before insurance activation.
Active insurance - 1 scan per provider per calendar month. Your insurance is active with monthly reporting.
Insurance expired - no scans available. Contact your broker to renew insurance coverage.
Your HDI Cyber Risk Score is a comprehensive security rating that combines technical infrastructure scans with organizational security practices:
Score Ranges:
Initial Security Assessment
Run scans for all your cloud providers during trial period, complete questionnaire, review results with broker.
Monthly Reporting Scan
Run monthly scan to track security improvements and identify new issues in your infrastructure.
Improving Your Score
Use scan findings and recommendations to fix security issues, re-scan to see improvements reflected in score.
- Complete questionnaire immediately after scan for most accurate HDI score
- Review detailed findings in scan results to understand specific security issues
- In monthly reporting mode, use monthly scan allowance strategically after implementing fixes
- Contact your broker if you need help understanding results or recommendations
- Keep credentials secure - never share scan access keys or passwords
If you need assistance with your security assessments or have questions about your results:
Contact Your Broker
Your broker's contact information is displayed in the 'Your Insurance Broker' section on your dashboard.